The Amazon marketplace is the most underutilized online source of revenue. People generally look for a cash transaction on Craigslist or for a simple way to sell on eBay.
What they don’t realize is that selling on Amazon generates passive income.
Like anything else in life, there are learning curves.
Think back to the first time you learned to tie your shoes. It was frustrating, and you probably thought you would never get it. But then that glorious day came when you said bye bye to Velcro (I hope).
Selling on Amazon is no different. There will be learning curves.
But if you follow this step by step procedure, I can guarantee you that it will be much less frustrating and much more rewarding than tying your first pair of bunny ears.
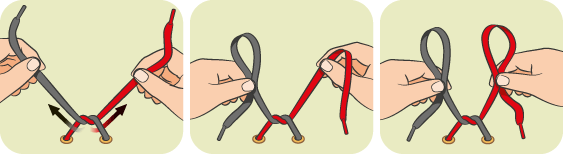
So it’s time to rip off the Velcro and strap on your first pair of pump ups.
Let’s walk right into the bulletproof strategy and process to automate profits on Amazon.
The Beauty is in FBA
There are two ways to sell and ship on Amazon:
- Optimize your listings and ship your own orders.
- Have Amazon ship your orders on your behalf (FBA).
Fulfillment by Amazon (FBA) is a beautiful thing and it’s the easiest way to make money on Amazon. Period.
Here’s how it works:
- Buy products that sell for less than Amazon prices – 30 minutes
- Create listings – 30 seconds per listing
- Label and package your products – 15-30 minutes
- Ship your products to Amazon
- Wait and profit
The beauty is not in the process, but it’s in the service.
With a traditional store, you’ll have to provide customer service, answer product related questions and manually pack and ship your items.
Amazon’s FBA service takes care of everything. You won’t have to handle customer service, put up with unreasonable customers or even ship your own orders.
On top of having your own dispatch and customer service teams…
Amazon FBA sellers dominate the buy box.
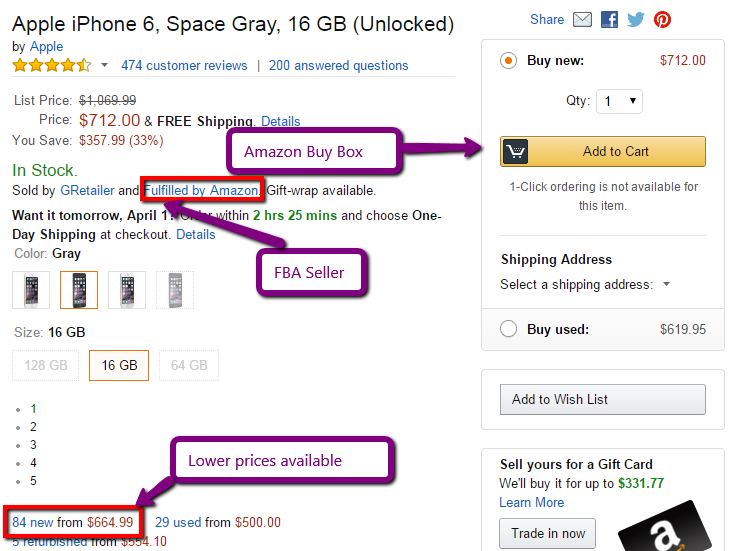
The FBA seller GRetailer is selling an iPhone 6 for $712. You can see that there are new items for as low as $664.99 (-$47.01), which is a lot higher than other sellers’ lowest prices.
When looking at my business reports, 98% of my sales came from the buy box.
When was the last time you bought something not in the buy box?
Let’s review a simplified version of the process to sell on Amazon step by step:
- Find it
- Ship it
- Bank it
This is exactly what I did to make 75k in revenue, profiting over $30,000 in 14 days.
Here’s the best part:
I only put in 7 hours for an hourly rate of $4285.71.
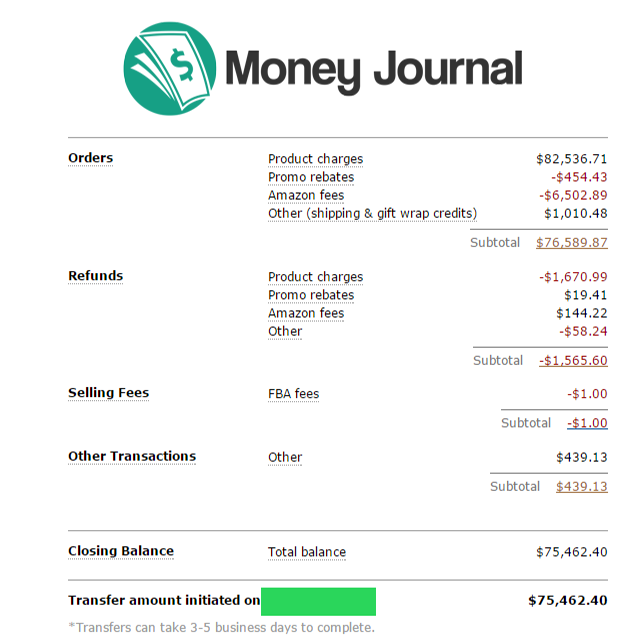
The month ended with a net profit of just over $50,000 for less than a days worth of work.
Finding Winning Products and Profit Potential
I’ve sold thousands of products on Amazon and have yet to take a loss. I’ve gone through periods of anxiety investing over $60,000 on a single product.
Here’s how you can reduce risk and prevent a “purchase heart attack”:
- Don’t invest more than you are comfortable losing.
- Make smart purchases, not impulsive ones.
- Do your research.
Guaranteeing a Sale on Amazon with 3 Second Research
While there are a few well known strategies, I have found this one to be the easiest and fastest to turnover a profit.
Amazon has a best sellers’ rank (sales rank) for most products. Sales rank is an indication of how well a product sells and is updated hourly.
![]()
So what’s a good sales rank on Amazon?
Generally speaking, I like to find products with a sales rank of less than 4,000 in a broad and popular category.
Keep in mind that opportunity cost will play a massive role in my product selections. If the opportunity is tremendous, I may go for sales ranks of less than 100,000 in a broad and popular category.
The key point to take away from this is: The lower the sales rank, the more likely the product will sell quickly.
Sourcing ‘Stuff’ to Sell on Amazon
You probably don’t have suppliers that will sell you products for 30% less than Amazon prices.
No worries. Neither do I.
Here’s how I let the products find me:
- Register for big box store newsletters with product prices you understand (Target, Walmart, Home Depot etc.)
- Wait for their flyers to be emailed to you
- Skim their offerings and compare with Amazon
I know, it sounds too good to be true. But it’s not.
You’ll go through tons of flyers and may not find anything at all. But the few that you find will be your easiest, greatest and most profitable hustle.
I’ve made so many purchases doing this that I’ve collected enough rewards miles to travel the world four times and back.
Another great way to stay on top of flyers is by using the Flipp App. You can download it from the iTunes store or Play Store.
Cost to Sell on Amazon
Does it cost anything to sell on Amazon? Of course it does.
Amazon has roughly 244 million customers (May 2014) that sellers gain free exposure to. Over 20 million are Amazon Prime users which directly benefits FBA sellers.
Here are 5 expenses to consider when selling on Amazon’s FBA program:
- Product purchase prices
- Shipping costs to Amazon FBA
- Amazon referral fees (Amazon.com’s chart)
- Warehouse storage fees (Amazon’s FBA storage calculator)
- Subscription fees ($0.99/transaction vs.$39.99/month)
The two main items I give attention to are the cost of my products and the cost to ship to Amazon’s FBA warehouses.
Fortunately, Amazon has an FBA calculator that does the rest.
Just find your product, enter your expected sale price, inbound shipping costs and the cost of your product. Then look at the profit table and make an informed purchasing decision.
Here’s an example of selling ten iPhone 6s for $700 each (note: I put the cost of the product under prep service).
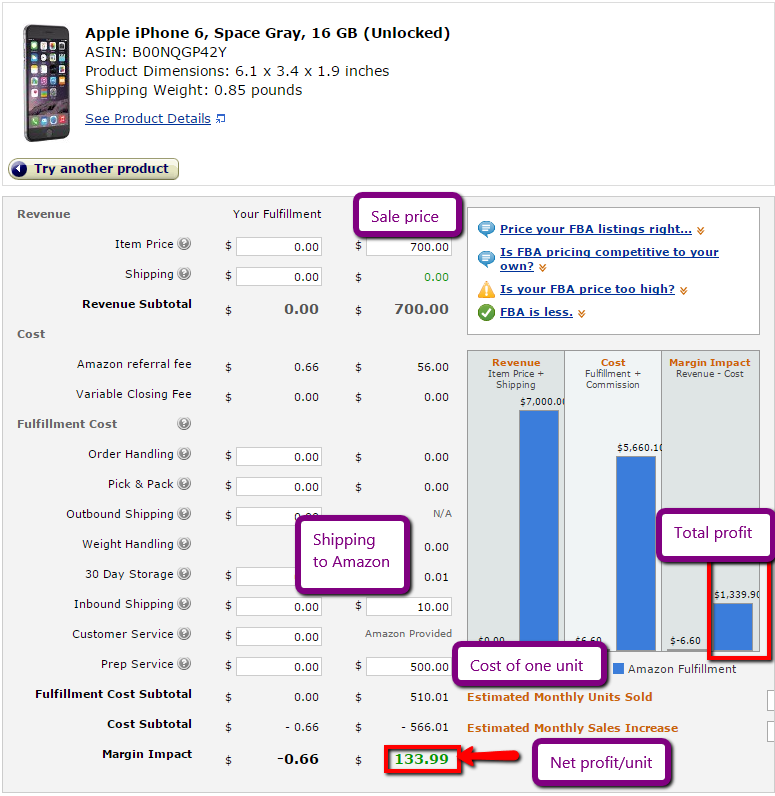
The best part about this $1,339 profit is that you can expect it to sell in less than a day of it being checked in.
Why?
Because its current sales rank is #528, you have a low quantity and it’s in a super competitive broad category (cell phones & accessories).
So how do we put this Amazon awesomeness into action?
Step by Step Guide to Start Selling on Amazon Now
The Amazon marketplace you choose will likely be based on your geographic location.
Why?
Because it’s cheaper to ship items to locations that are closest to you.
I’m located in Canada and sell on both Amazon.com (USA) and Amazon.ca (Canada).
Here are the step by step instructions on how to sell on Amazon:
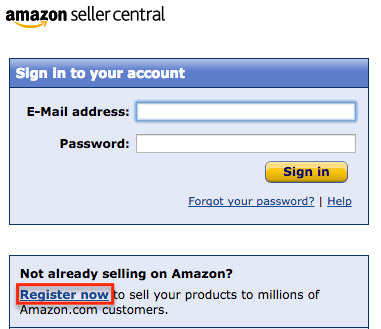
- Visit sellercentral.amazon.[com, ca, co.uk etc]. Alternatively, you can Google “Seller central Amazon [country name]”.
- Click the Register Now link.
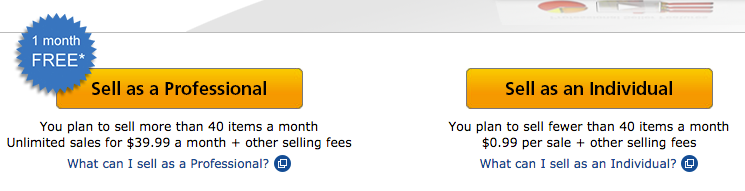
- Choose your plan. Amazon charges $0.99 per sale for individual plans and $39.99/month for professional plans. If you think you’ll sell more than 40 items per month, choose the pro plan. There are more features with the pro plan like business reports and charging sales tax.
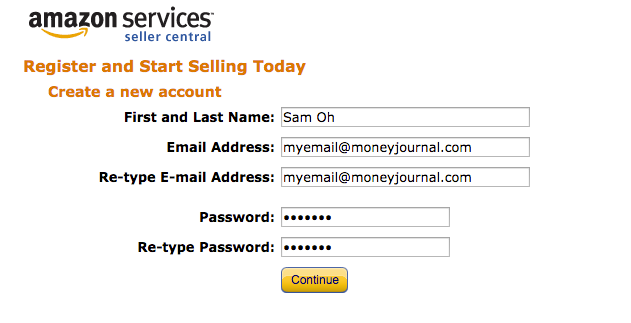
- Create a new account or login with your existing Amazon account.
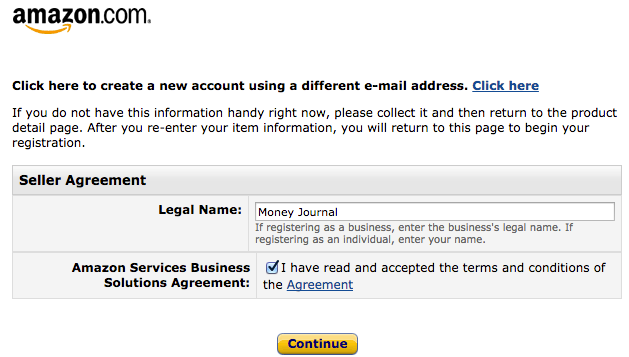
- Enter in the legal name of your company. If you don’t have a registered company, enter your first and last name. Don’t forget to read the agreement and continue.
- Add your credit card information. Amazon requires this in case your account hits a negative figure.
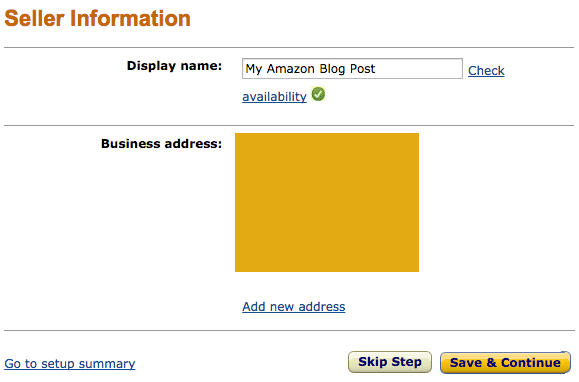
- Select your display name. This is what others will see your store name as. After you’ve checked its availability you can continue.
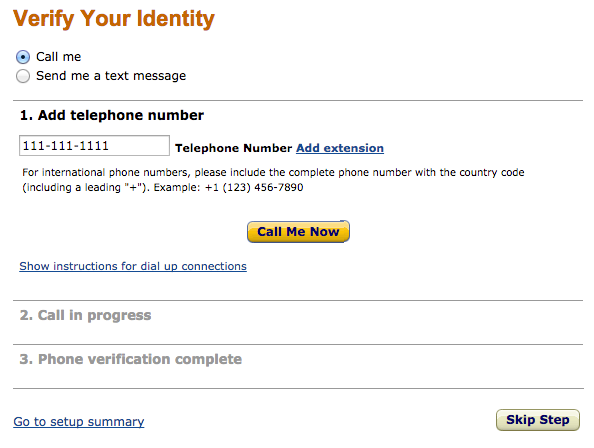
- Verify your identity by phone call or text message.
- Complete the registration after you have passed the phone verification.
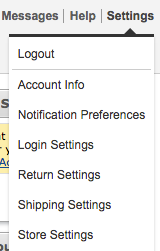
- Go to settings -> account info.
- Scroll down to deposit method and click add to enter your banking information. This is used to receive your payments by direct deposit.

- Verify your banking information so you’re all set up to receive payments.
Signing up for FBA automation
First things first:
We need to enable fulfillment by Amazon in our seller account. If you’re selling on Amazon.com, head on over to the FBA registration page.
Hit the get started button and select add FBA to your account.
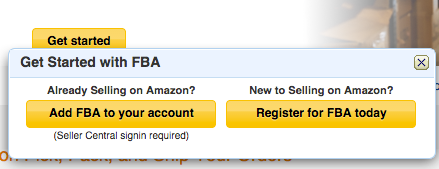
Read and accept the user agreement and then proceed to get started with Amazon FBA.

Choosing the best FBA settings
Go back to your Amazon seller account and refresh the page. Hover over the settings tab and click on the new menu Fulfillment by Amazon.
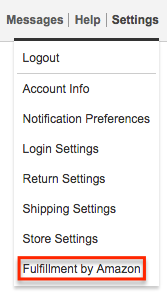
There are a ton of options here, but we’ll focus on the single most important setting: Inbound Settings – Inventory Placement Option.

There are two options for your inventory placement settings:
- Distributed Inventory Placement (DIP): Ship your items to multiple Amazon warehouses.
- Inventory Placement Service (IPS): Ship your items to a single Amazon warehouse and have Amazon distribute them to their other fulfillment centers.
Since I generally send 10 to 100 items to Amazon per shipment, I prefer the Inventory Placement Service.
To get a better understanding of why, check out their inventory placement fees.
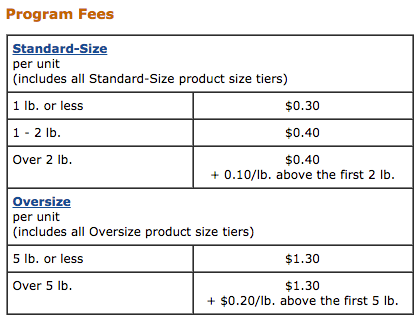
The majority of my items are less than 2lbs and fall into the standard size category. If I were to set up an FBA shipment for 20 iPhones, Amazon would likely have me ship five units to four different warehouses.
Shipping costs would run me about $80 in total.
On the other hand, if I ship the same 20 cell phones to a single warehouse, my cost on shipping would be about $35 + the inventory placement fee for 15 units ($0.30 x 15 = $4.50) for a total shipping cost of $39.50.

Your most cost efficient model will depend on the:
- number of units per box
- weight and size of each item (standard vs. oversize)
- total quantity of items being sent
I generally choose the DIP setting when my quantities are massive or when boxes are filled with mass quantities.
You can switch between the two placement settings at any time.
Add your Winning Products to your Inventory
Hopefully, you’ve found some winning products to sell on Amazon. Before you can start selling, you’ll need to add it to your inventory.
This is an absolutely seamless process and should take you about 30 seconds to create each SKU.
Here are 7 micro steps to add an item to your inventory:
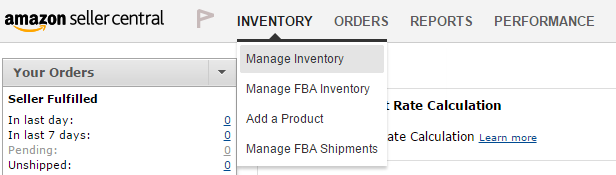
- Navigate to Inventory -> Manage Inventory from the menu bar.
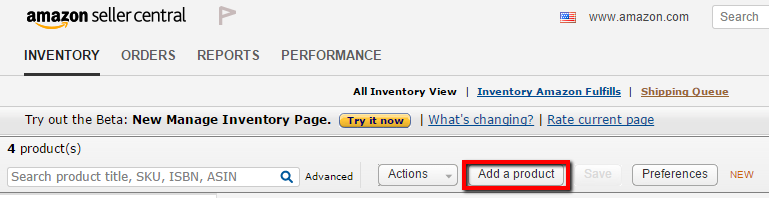
- Click add a product in the sub menu of your inventory page.
- Search for your product with a product name, UPC, EAN, ISBN or ASIN and click search.
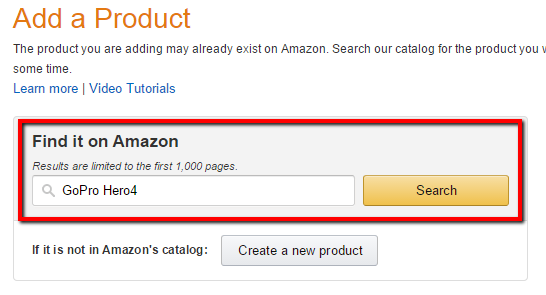
- Choose the correct product. Make sure the model and color are the same. When you’ve found your product, click Sell yours.

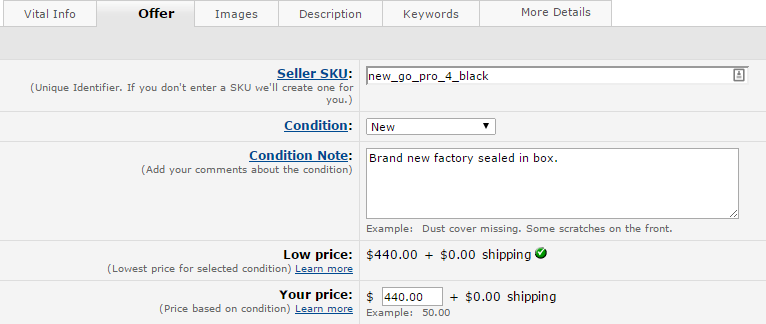
- Set a seller SKU, condition, condition notes and price. Seller SKU and condition notes are optional.
- Scroll to the bottom of the page and select “I want Amazon to ship and provide customer service for my items if they sell”.
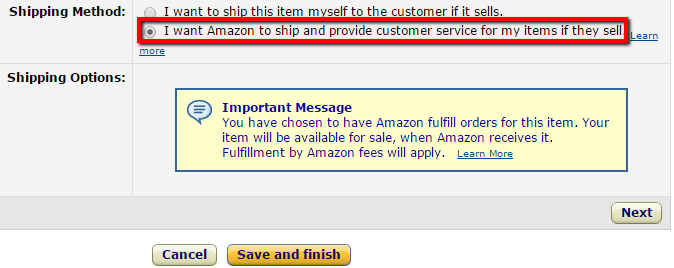
- Click save and finish. You’ll be sent to a new page, but we can ignore that for now since we’ll be sending multiple different products.
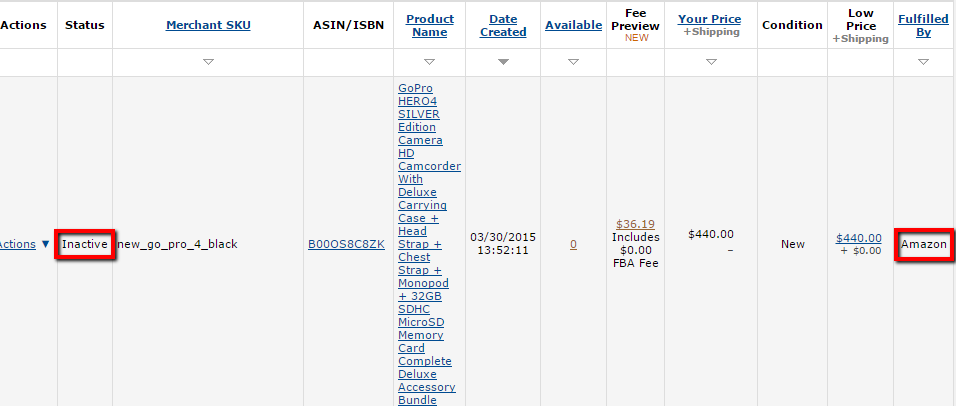
Rinse and repeat until you have all of your items added.
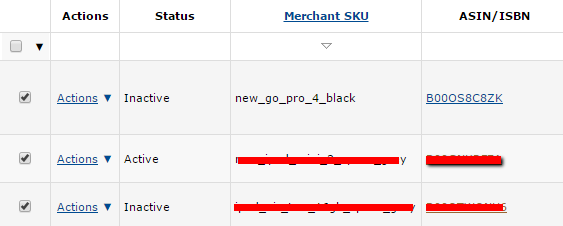
It generally takes a couple minutes for the product listings to fully populate in your inventory. You’ll know it’s ready when you see the columns status as “inactive” and fulfilled by set to “Amazon”.
Sending your First Shipment to Amazon FBA Warehouses
By this point, you have:
- signed up for an Amazon seller account
- enabled Fulfillment by Amazon
- chosen the most profitable inventory placement settings
- added inventory
It’s time to ship the items and wait for your sales to roll in.
Here are another 7 micro steps, and I promise you that you’ll be in passive income mode from here on out.
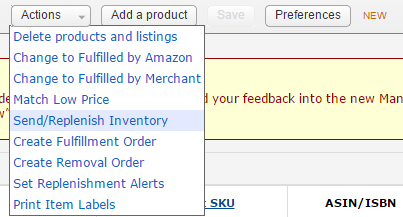
- From the inventory page, select all listings that you wish to send to Amazon.
- Select the actions button and choose send/replenish inventory. Confirm your selection on the next page.
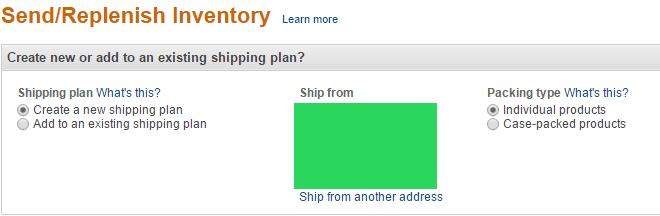
- Create a new shipping plan, confirm your shipping address and select individual products or case-packed products. If you’ve purchased items that were not delivered from the manufacturer, you will likely need to choose individual products. Continue to your shipping plan.
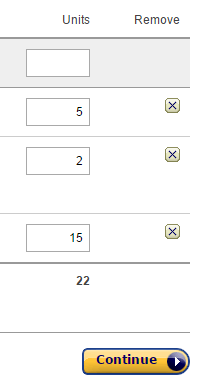
- Enter the quantities you will be sending for each item and click continue.
- Click continue again if you do not need shipping supplies.
- Print labels for your products. Amazon requires items to be labeled so they can match your inventory with your seller ID. Labels should be placed on each item to cover existing bar codes. Here are the labels that I use which work with any standard laser printer. After you’ve printed your labels, proceed to the next step.
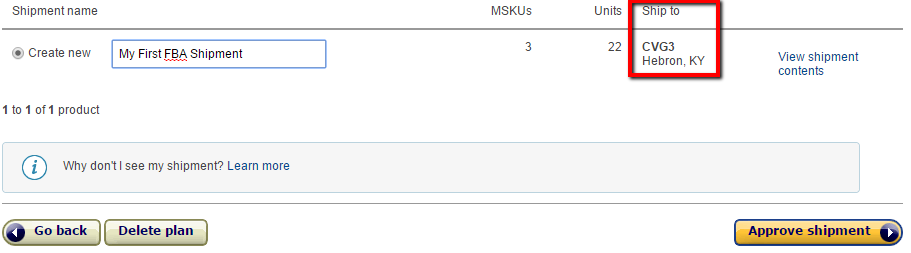
- Confirm your shipment details. Amazon will show you which warehouse(s) you will need to ship to. If you set the inventory placement correctly, it will show one single ship-to location. Approve your shipment when you’re ready.
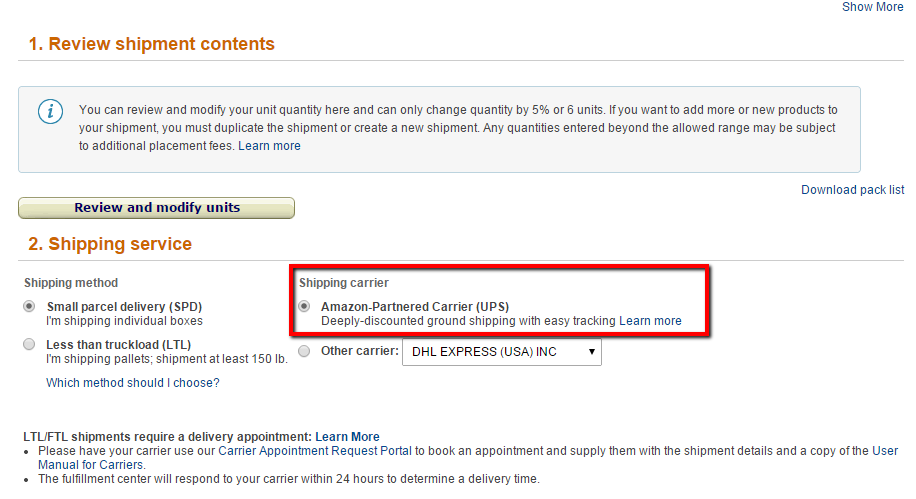
- Proceed to work on your shipment.
- If you do not have a courier you work with, choose Amazon-Partnered Carrier (UPS) to take advantage of their discounted rates. Amazon partner shipping is only available domestically.
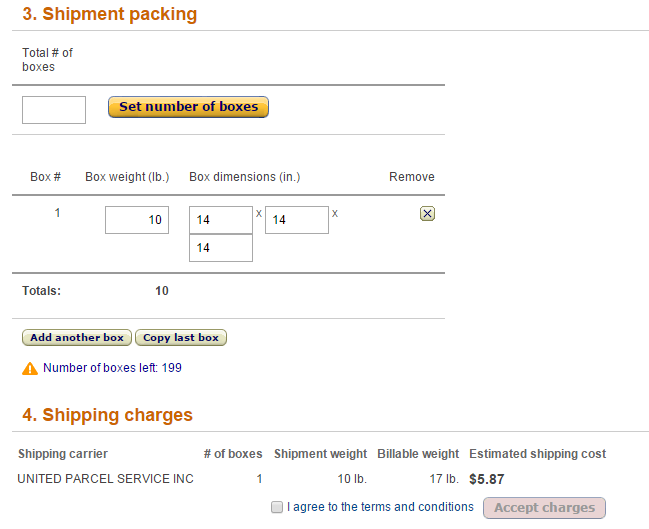
- Set the number of boxes, weight and dimensions. Click the calculate shipping button after and accept the charges if you agree.
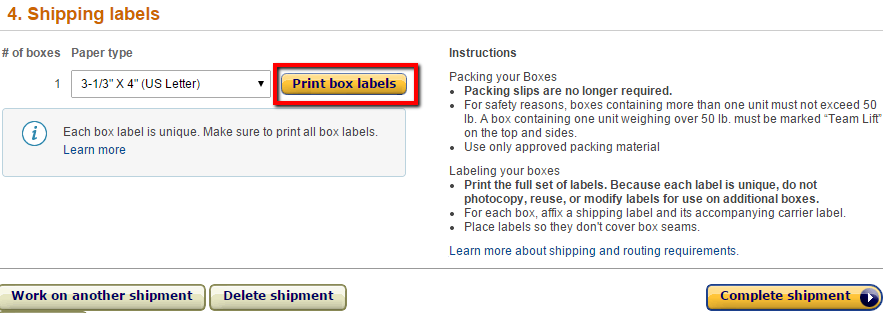
- Print your box labels. You will need to attach a label to the top of each box so Amazon can connect your shipment to your seller ID. Complete the shipment when you’re ready.
Enter your tracking number if you shipped with your own courier.
Amazon Seller Support to the Rescue
There will likely be questions and hiccups that come with selling on Amazon. The best way to have your questions answered is to contact Amazon’s seller support.
It’s super easy to contact them. Scroll down to the bottom of any page in your seller account and visit the “Contact Seller Support” link.
Choose the appropriate category, enter your phone number and wait for a call-back.
Your phone should start ringing within seconds and your hold time should be no longer than a minute.
Will you Seize the Day?
Selling on Amazon took me a good month to learn and 3 months to master.
It’s only because I didn’t have a step-by-step guide that outlined exactly what to do and when to do it.
I’ve put together an exclusive bonus just for this post to help you win your first $300 Amazon profit.
Just click the image below, enter your email and I’ll have it sent over to you in a jiffy.
Seize the day.
While you’re Waiting for Some Bulletproof Tips
Do you think selling Amazon is worth your time?
Leave a comment 🙂