
Google Analytics (GA) has become an asset for literally every blog and business that has an online presence. For someone who is starting a website for the first time, the last thing you think about are web analytics. If you’ve heard of this invaluable tool before, you’re probably wondering…
What is Google Analytics and why use it?
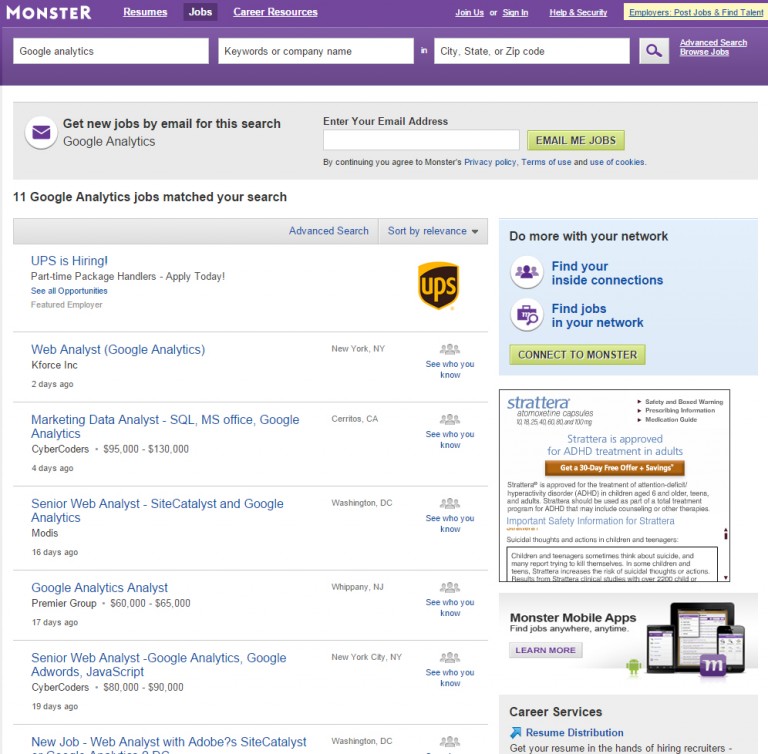
Before we dig deep into setting up Google analytics, take a look at a quick search that I did for jobs requiring Google Analytics on Monster. Companies are willing to pay a salary of $130,000 and guess what … Google Analytics is a requirement!
Analytics is important and so is starting your business the right way! Sign up for my FREE crash course to build a business from the ground up.
Whether you are a first time user or a veteran in websites, do you have your analytics set up correctly to provide you with the most accurate, relevant and effective data? Or are you simply copying and pasting the tracking code into your website and checking to see if you got more traffic than yesterday?
Without fail, the first thing that I do before I launch any of my website is to make sure that I have my Google Analytics account installed properly! Why? Because it’s going to provide me with data that I can use to create a better user experience for my visitors, increase conversion and make a website that works!
By the end of this gangster guide to setting up Google Analytics, you’ll be able to:
- Install Google Analytics into your WordPress, Joomla, Drupal, HTML or any other configuration.
- Track goals and conversions
- Get the most accurate data using GA filters
- Get into the mindset of a Google Analytics Gangster
Page Contents
What is Google Analytics, who uses it and why should I you must use it?
Google Analytics is web software that is provided by Google free of charge! They do have a premium service that costs a whopping $150,000/year! Larger companies like Travelocity, Intuit and Go Pro have bought into this service, but for the average person like you and I, the free version will be more than enough for our present needs.
GA’s purpose is to provide detailed statistics about a website’s traffic, conversions, sales, and sources of traffic. They are by far the leading web analytics software provider without any close competitors.
There are way too many website owners who look at the stats and say “YAY! My traffic went up!”, raise their hands and carry on with their content creation. I definitely understand the feeling and shamefully have to admit that I too have raised my hands up in celebration as well.
Google didn’t create this web analytics software so we can feel good about ourselves, but it was designed so we can improve our websites using real information about how our visitors interact with our website and how they got there.
On the other spectrum, people see their website traffic have a sudden drop, sulk and eventually abandon their website because they don’t see a point in pursuing it any further.
The more important question to ask is why?
Google Analytics is a free tool that we must use to improve the quality of our websites. You may not care as much as the next person about making the web a better place, but the benefits that you will reap by creating a higher converting website will undeniably increase your conversion rate and ROI.
How to Install Google Analytics – Adding the Tracking Code
The way that Google Analytics tracks your website statistics is by adding a few lines of code to your website. If you’re not a programmer, no worries! It’s just a matter of copying and pasting what Google gives you into your website.
If you’re using a content management system (CMS) like WordPress, Joomla or Drupal, then I’ve made some simple tutorials with recommended plugins to install Google Analytics.
If you have a static HTML site or a website not using one of these CMS, then I have a quick tutorial for you to show you how to install the Google Analytics tracking code.
Setting up Google Analytics and Finding your Tracking Code
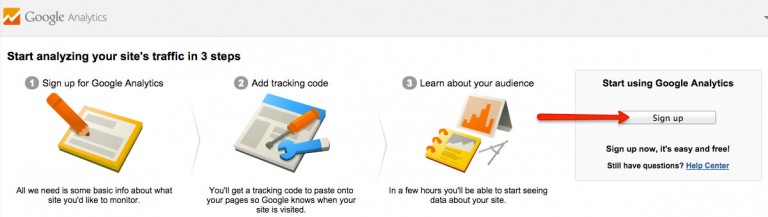
If you’ve never used Google Analytics before, you might find it difficult to set up your account. The only thing that you need is a Google account. If you don’t have one yet, you can sign up for one for free.
- Go to the Google Analytics homepage
- Click on Access Google Analytics in the top right corner if you’re already signed into a Google account. If you don’t have a Google account yet or you’re not signed in, you’ll see two links in the top right corner that say Sign in or Create an Account. Take note that the anchor text or location may change as Google changes the look of their site if you’re reading this on a future date.

- Sign in or create an account.
- Click the Sign up button
- Enter in the required information
- Account Name: This is the top most level of your account. You can think about it as creating a new folder. If this is the only website that you plan on running, you can just name it something that is easy to recognize like your domain name. If you’re running multiple websites, you might want to organize it by the niche, way of monetization or something that helps you easily identify which websites would be under that group.
- Website Name – This would be the nickname for your website. I find that the easiest name to input here is your domain name.
- Website URL – The full website URL for your website. If your website is redirected to the www version, enter www.domain.com. If you use the standard http://domain.com, then enter in just domain.com.
- Industry Category – Although not required, it is recommended to choose which industry your website is in.
- Reporting Time Zone – I always set this to my time zone. It basically sets a day to end at 11:59:59 PM your time. I’m in the Eastern Time Zone, so if I set the time zone to the Pacific Time Zone, then I won’t be able to see my full day’s results until 3:00 AM at my local time. You may want to set it up to the time zone that your demographic is in as well depending on the kind of website you are running.
- Data Sharing Settings – The descriptions for these are provided beside each category. It doesn’t hurt to leave them on so Google can better assist you in getting better results. It is most beneficial if you ever decide to integrate Google Adwords with your Analytics so your account specialist can have access to your Anaytics.
- Click on Get Tracking ID
- Select the terms and agreements for your country. I’m in Canada, so I set it to Canada and click that I accept after reading through their terms.
- Your tracking code should now be available! You can now follow the next steps to install it into your appropriate configuration.
Now that we have our tracking code, we can simply copy and paste the data into our website’s source code. Below are tutorials on installing the Google Analytics tracking code for WordPress, Joomla, Drupal, static HTML5 or any other configuration. Here’s my sample tracking ID. The only thing that you should understand about this snippet of code is where your Google Analytics tracking ID is.
![]()
As you can see, your tracking ID is part of the code that you need to insert into your website.
How to add Google Analytics in WordPress
If you’ve created your website using my tutorial on how to make a website, then this will be really simple for you. WordPress offers the largest selection of third party plugins. If you followed my tutorial on how to design a $30,000 website for under $60, then you’ve probably noticed that there is a place to insert your Google Analytics tracking ID. Most custom built premium themes come with an area where you can copy and paste your Google Analytics tracking ID. Every theme is different and is therefore configured differently. Here are a couple examples of what it might look like if you have purchased a premium WordPress theme.
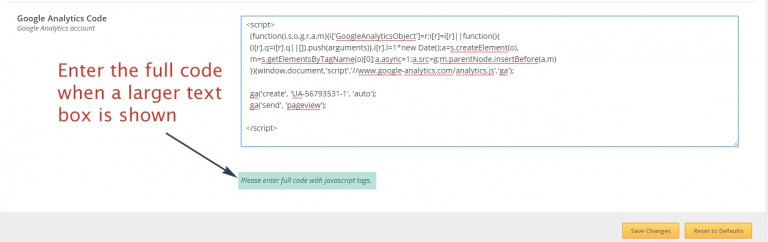
If a large text area box is shown, it generally means that you should copy and paste the whole code provided from Google Analytics.
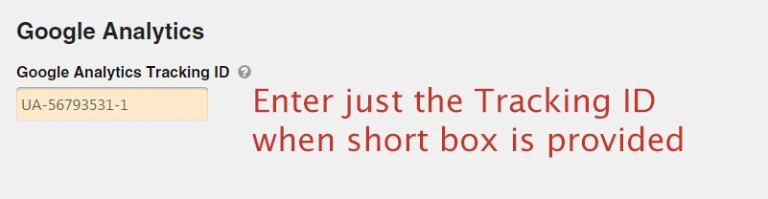
Other themes provide a lightweight option where they only require the tracking ID. Copy and paste your tracking ID which should begin with UA and be numerical from there on.
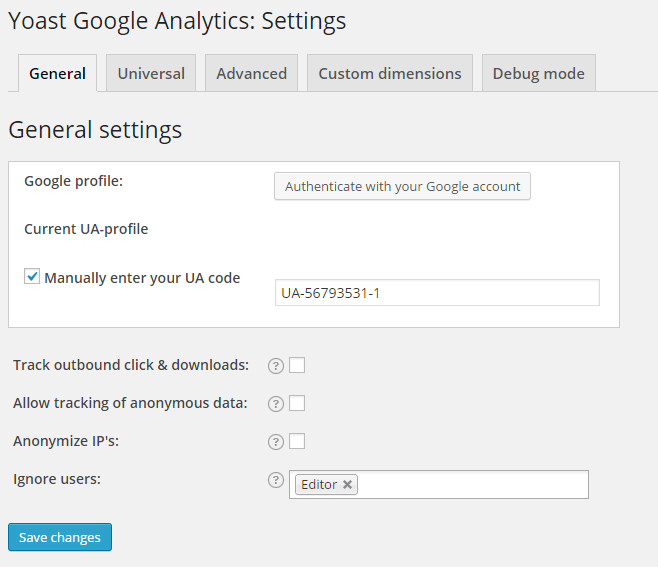
If your theme does not have an option to insert your Google Analytics tracking code or tracking ID, you can install and activate a plugin called Google Analytics by Yoast.
After you’ve activated the plugin, choose settings on the main plugins page.

Check the “Manually enter your UA code” and copy and paste your Google Analytics Tracking ID. After you’ve verified that your settings are correct, hit the save changes button.
After you’ve added the Google analytics tracking code to your plugin, it should take about 24-48 hours for your data to be available for you in your Google Analytics Dashboard.
How to add Google Analytics in Joomla
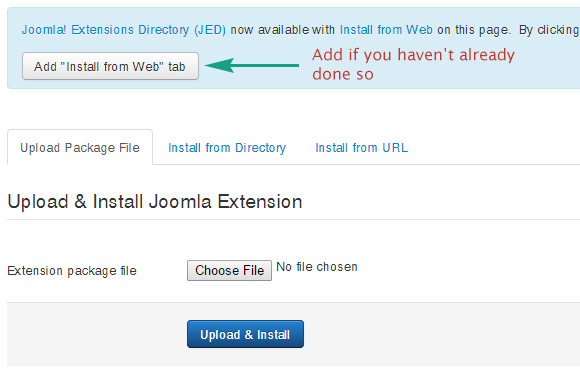
Installing Google Analytics in Joomla is similar to WordPress. WordPress uses plugins while Joomla uses Extensions. Navigate to the extensions tab in your Joomla admin panel and select extensions manager.
If you haven’t already added the “Install from Web” tab, install it now. If you already have, then you’re ready for the next step!
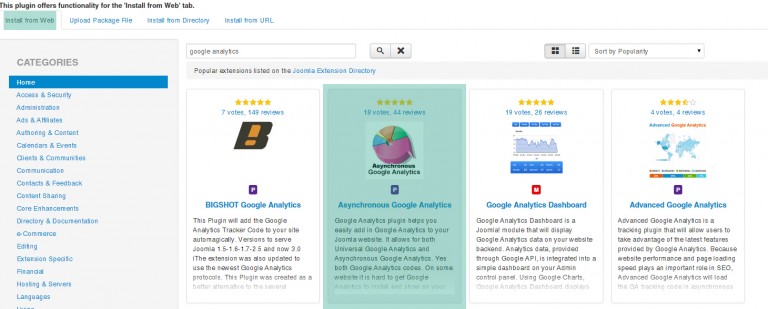
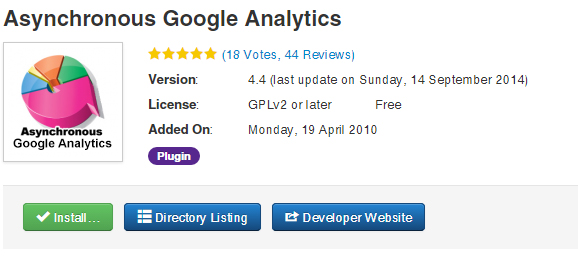
Make sure that you have selected the Install from Web tab. In the search box, type in Google Analytics and select the Asynchronous Google Analytics extension.
Click the install button and confirm the installation.
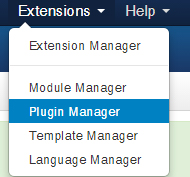
After you have installed the Asynchronous Google Analytics plugin, navigate to the Extensions -> Plugin Manager menu at the top admin menu bar.
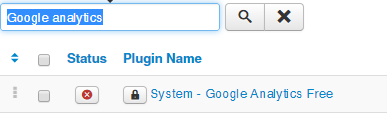
Search for Google Analytics in the search bar and you should find the plugin that we just installed. Click on the plugin name to edit it.
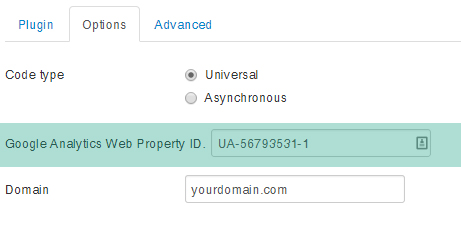
Click on the options tab and enter in your Google Analytics tracking ID where required. Hit the save button once you have entered in your Analytics tracking ID.
Navigate back to the Plugin tab and change the status from disabled to enabled in the right sidebar. Click the save button one more time.
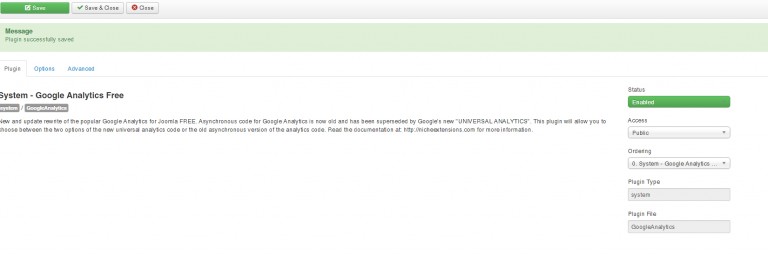
This will ensure that your Analytics tracking code is live and tracking your data.
How to add Google Analytics in Drupal
The easiest way to add Google Analytics to Drupal is by downloading the Google Analytics module. In my tutorial here, I’m installing the Google Analytics module on Drupal version 7.33.
After you’ve downloaded the file, unzip the file into the modules folder. If you’ve done this correctly, you should be able to see the new module added under the modules tab in your Drupal Admin under the group Statistics.
Make sure that you’ve checked the Enable box and save the configuration.

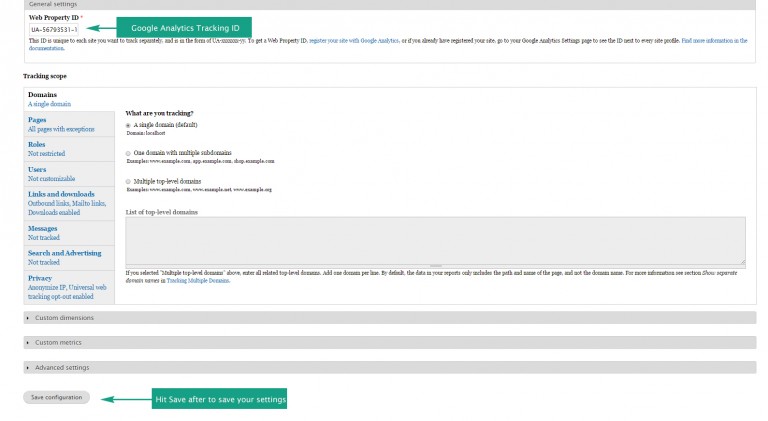
Scroll back to the Google Analytics module and hit the configure button.

Insert your Google Analytics tracking ID and click save configuration.
How to add Google Analytics with any other Configuration
If your site is running on a custom configuration like static HTML5 files or your own PHP files, you can easily add the Google Analytics code following these steps. Also, if you’re comfortable with editing the source code in any of the CMS mentioned and prefer not to use a plugin, you can use these steps as well.
Open up the file(s) that you wish to add Google analytics to. If you are running your site with a template, you will probably want to look for the head.html or head.php file. If you have each page as a standalone page, I would strongly recommend changing over to wordpress. It literally takes 5 minutes to set up and you can follow my WordPress installation guide here. You’ll get a lot more flexibility and be able to scale your site a lot better than using static pages.
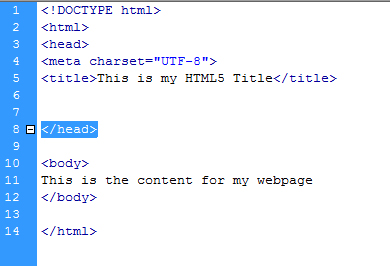
If you still want to install Google analytics to your HTML page, you want to look for the tag </head>. Open up your favorite text editor with the page you would like to edit and do a CTRL + F (PC) or CMD + F (mac) for the tag </head>.
Navigate back to your Google Analytics panel and copy and paste the entire tracking code above the closing head tag.
</head>
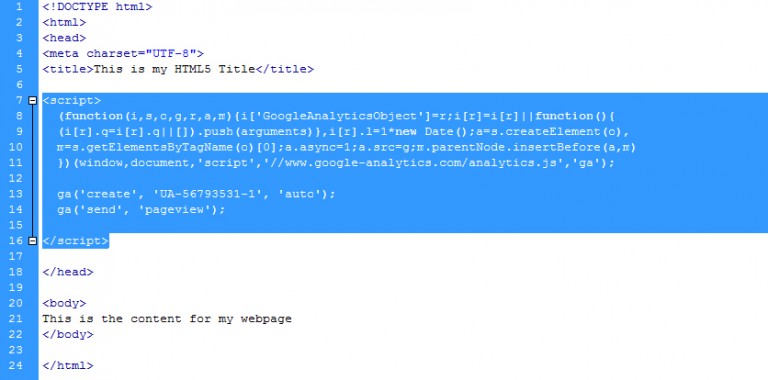
Save your file and you should be all set to go!
Keep in mind that if you do not have a template that you are using for static HTML files, you will have to insert the code into every single page in order to track them all. At some point in time you will find that you need to change over to a more robust content management system like WordPress. You can watch my video tutorial on how I set up my WordPress configuration in less than 5 minutes.
Setting up Google Analytics for the Most Accurate Results – Necessary Filters
Awesome! Now that we have Google Analytics installed on our website, there are two absolutely necessary filters that we should configure. These filters often get overlooked, but they allow us to get more accurate results of how our web pages are performing.
Filter #1: Exclude your IP Address
An IP address is essentially your Internet connection’s personal identifier. In the beginning, you will probably be the one who visits your website the most. What we don’t want are your personal visits to contribute to the data in Google Analytics.
If there are a few places that you work frequently, you may want to create a few exclusions so your data is not skewed. I omit my office IP, home IP and my favorite Starbucks IP address to make sure that my personal visits will not affect the real data.
Click on the Admin tab on the top of your Analytics screen and then select filters. You want to make sure that your website is correctly selected from the 3 drop down menus above.
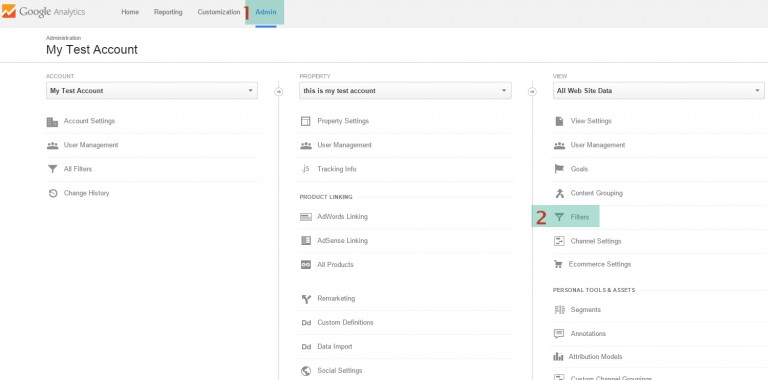
Select the New Filter button. We’ll now create our first filter. You can name it whatever you want, but I like to name mine Exclude [Location].
- Make sure that the Predefined filter type is selected.
- Select “Exclude” from the filter type drop down menu.
- Select “traffic from the IP addresses”
- Select “that are equal to” from the expression drop down menu.
- Find your IP address at http://www.whatismyip.com/
- Copy and paste that IP address into the IP address field.
Your settings should look like this when you’re done. If everything looks right, click the save button.
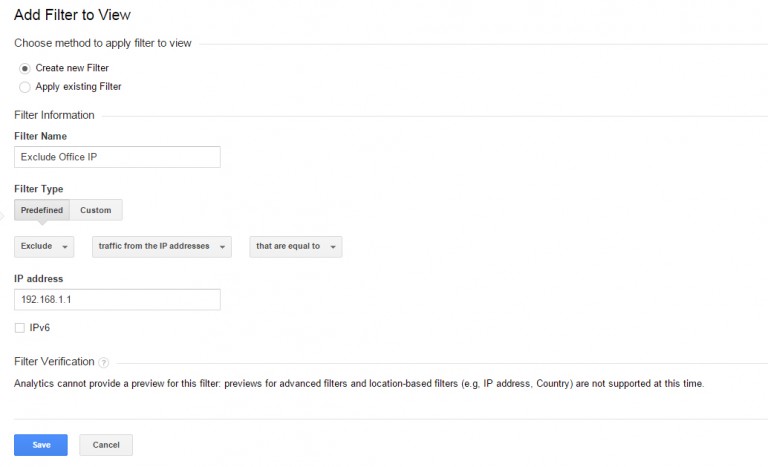
You’ll see that the new filter was added. If you have multiple IP addresses, you can add more filters and repeat the above steps.
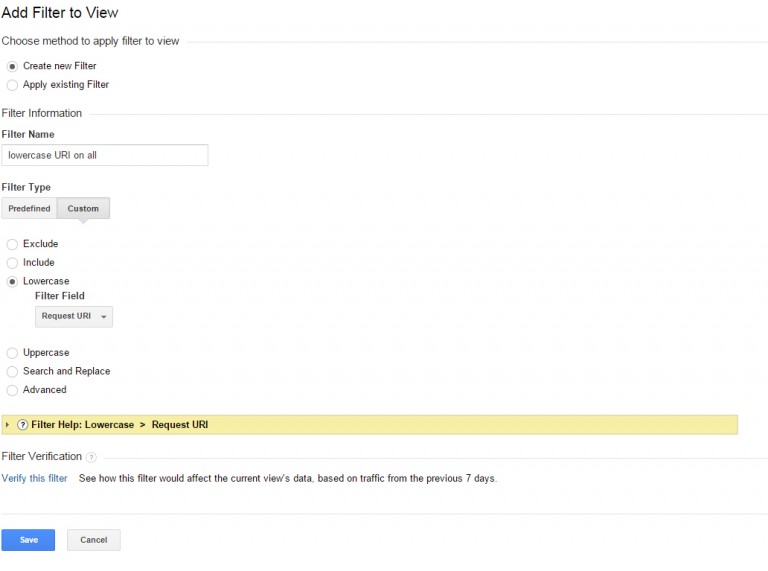
Filter #2: Exclude lowercase and uppercase on URI
People have a funny tendency to uppercase some letters and lowercase others. For example, if you wanted to read my about page, you can reach it by going to www.moneyjournal.com/about as well as www.moneyjournal.com/About. You can see that the URI is the same with the exception of the capital letter A in the word about.
The visitor would be sent to the same content, but Google Analytics by default would record it in your data as two separate pages. We want to avoid false data like this, so we need to set up a filter to exclude the case sensitivity with the URI requests.
Again, navigate to the filters page and click the add New filter button. We’ll name this one lowercase URI on all.
- Choose “Custom” as the filter type.
- Select the Lowercase radio button
- From the drop down menu, select “Request URI” under the Filter Field.
Your settings should look like this. If yours look the same, click on the save button and you should have the two mandatory filters you should have to generate accurate data with Google Analytics.
After saving the filter, you should see a list of all of the filters you created.
How to Setup Google Analytics Goals – Track Website Conversions
Congratulations! You’re almost done setting up Google Analytics for your website. The last bare necessity is to set up your goals. Every website should have some kind of conversion goal. Whether it is a:
- sale
- contact form being submitted
- newsletter subscriber
- new account created
- eBook download
- or anything else that you want your visitors to do
Google Analytics has the ability to track these goals and provide statistics like your conversion rate by taking the number of visitors divided by the number of conversions over a set period of time. If you don’t have a conversion goal as of yet, you should probably think of one. What good is having awesome traffic if there is no goal for your website? Assuming that you have a goal in mind, let’s set up our first goal in Google Analytics.
Setting up Goal Tracking in Google Analytics
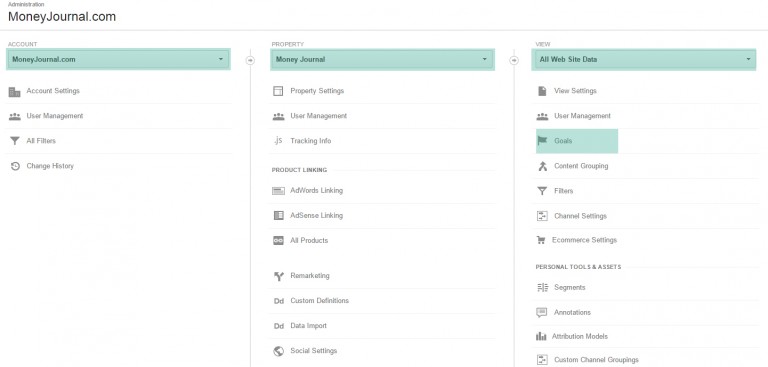
Click on the Admin tab in Google analytics, and select Goals. Make sure your website is selected in the three drop downs to ensure you are adding it to the correct Analytics account.
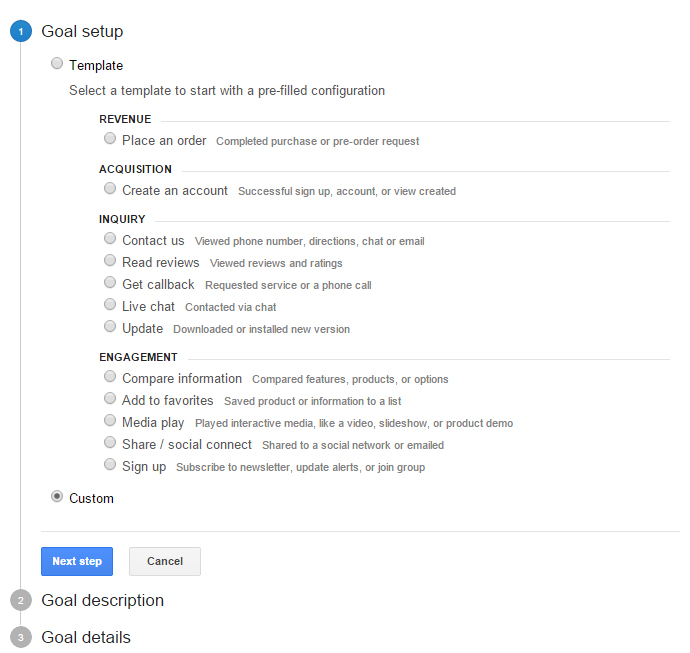
Click on the New Goal button.
You’ll notice that Google Analytics has a bunch of templates of common goals that people use. Some of these conversion goal templates include.
- Place an order (complete a purchase)
- Create an Account
- Contact us
- Read reviews
- Get callback
- Live chat
- Update
- Compare information
- Add to favorites
- Media play
- Share
- Sign up for newsletter
- Custom
For these examples, we’ll set custom goals since the templates will just fill out the next step in the goal setup process.
Once you’ve selected custom, hit the Next Step button.
If you ever want to go back and edit any of these steps, you’ll notice that there is an edit link beside each step.
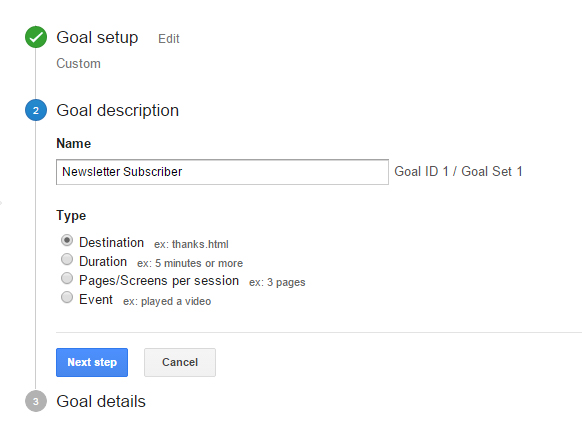
Destination Goal
Destination goals are specific URLs that a visitor will reach in order for your conversion goal to be completed. It is best to set a destination goal for confirmation pages which are typically shown on goal completions such as:
- Newsletter subscribers
- eBook downloads
- Contact form being filled out
We’ll set up our URL destination goal and call it Newsletter Subscriber.
Once a subscriber enters their e-mail address into the form field, they should be redirected to our “Thank you” page. If you’ve signed up for my crash course before, you’ll know exactly what I’m talking about.
Click next step.
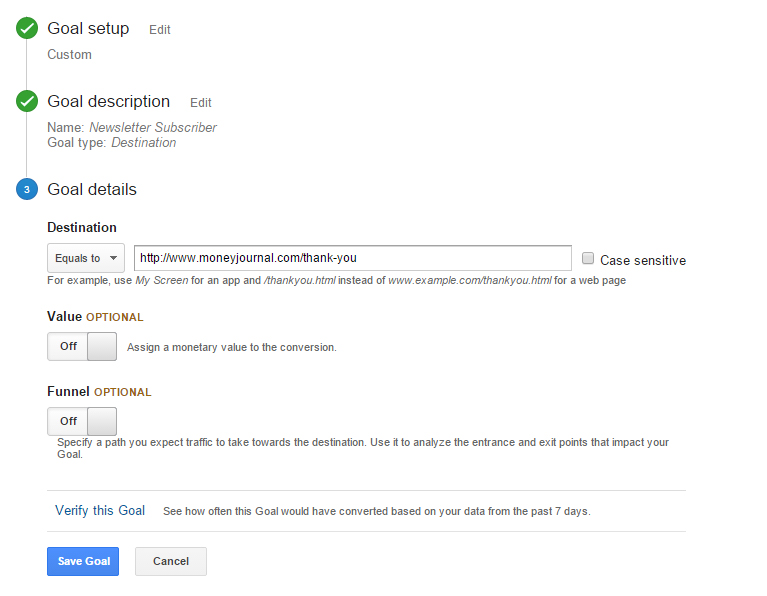
This is where we can set our destination. The destination is the URL that triggers a goal completion. Enter in the full URL of your thank you page. Most of us do not need to click the case sensitive button since a different URL is usually identified by a different destination URL.
You now have the option to provide a dollar value as well as funnel options. Since I’m not going to put a dollar figure on my subscribers, I’ll leave the value option set to off.
The Funnel option is great if you have multiple steps for a visitor to complete in order to be a successful conversion. The best example is for a visitor making a purchase from your website. The funnel option allows you to track each step of the conversion process and track where your would-be customers are abandoning the funnel process. This allows you to tweak these areas or shorten the funnel process with the hopes of increasing your conversion rate.
In the case of a newsletter subscriber, there is only one step in the funnel, so I can leave the funnel settings to off.
After you have set up your goal, click the Create Goal button and you’re all set! Your settings should look something like this, but may vary from my settings here depending on what your conversion is.
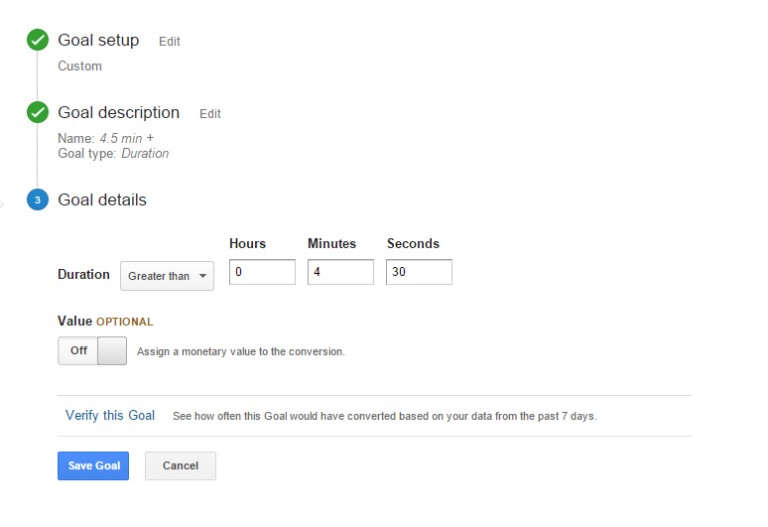
Duration Goals
Duration goals are exactly what it sounds like. One of your goals may to have greater user engagement. Generally speaking, the longer a visitor is on your website, the more engaged they are with your content. This goal is super easy to set up!
In this example, I named my goal 4.5 min+, which means that if a visitor stays on my page for longer than 4 minutes and 30 seconds, I can consider them to be engaged with my content. Here’s what my Step 2 – Goal description and Step 3 would look like.

I wouldn’t consider this to be the best way to track your conversions. Since Google Analytics tracks how long your visitors are on your website only by their session time, there are multiple variables that can distort this data. For example, when I’m surfing the net, there are times where I open multiple tabs at once and forget about a session. It doesn’t mean that I was necessarily engaged with the content, but that I had forgotten about it or was planning on going back to it.
Another common variable would be having to leave your computer for a restroom break, taking a phone call or running an errand.
I would caution using duration goals to measure your conversions as Google has not perfected this metric yet.
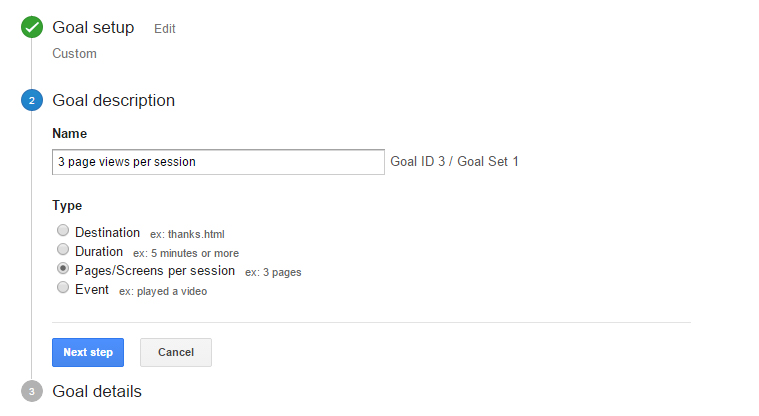
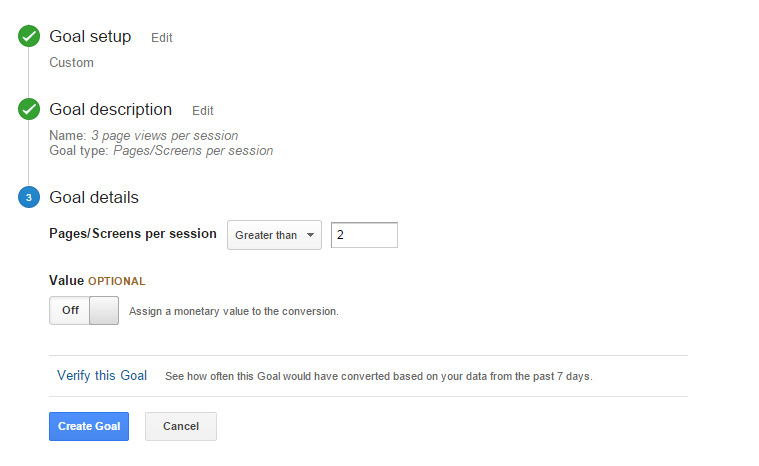
Pages/Screens per Session
This is a very simple set up again! This goal holds more merit than the previous duration goals. The purpose of the Pages/Screens goals is to track the number of pages that a visitor is viewing on your website before they leave.
I find that this is a better indicator of whether a user is engaged than the amount of time that they spend on your page. This is also another great way to tell if your user interface is easily navigable and engaging enough to earn the click of one of your visitors.
In the following example, we’ll call it 3 page views per session and set a goal to be triggered once a visitor has clicked over to greater than 2 page/screen sessions (which would be our third page viewed). Here’s what your goal settings would look like.
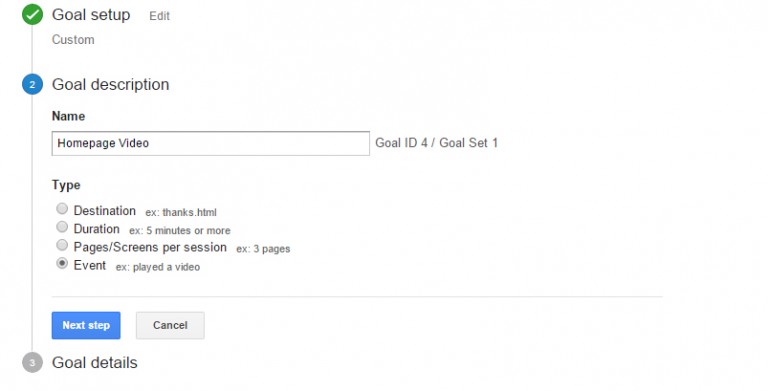
Event Goals
Our final goal option is to set an event goal. Event goals are a little broader, which allows you to track virtually any user action on your website. For example, if you wanted to track the number of times a video is played on a page or the number of times your PDF document is downloaded, you can use event goals to track these actions based on user clicks on specific links or videos. Event goals are essentially ways to track behavior on your website.
Note: In order to use Event goals, you will need to add a piece of Javascript code to the element you wish to track. I haven’t gone as far as adding the Javascript code, but will show you an example of how to set up your first event in Google Analytics.
For example, if you wanted to track the number of people watching 90% of your home page video, you can set up your goal description as “Homepage video” with the type set to Event.
We now need to set our event condition(s) using the drop down menus. You are required to input at least one category, action, label and/or value. Here are the four event conditions with their predefined options.
- Category – Equals to, Begins with, Regular expression
- Action – Equals to, Begins with, Regular expression
- Label – Equals to, Begins with, Regular expression
- Value – Greater than, Equals to, Less than
Keep in mind that your goal will only be triggered in Google Analytics if all conditions that you set are met.
Google outlines these steps the best if you’re interested in setting up these more complex goals:
It may take about 24-48 hours to get completely accurate data from Google Analytics, but you’ll now be tracking how effective your website is. If you find that your conversion rates are really low, it may be a sign for you to make some changes to your website and to focus on optimizing your conversion rate.
Save your goals and you’re all set to go! If you have multiple goals, you can set them up by following the same steps above. E-commerce settings may require you to insert more tracking code to your website so it can capture the dollar values of what your products are selling for. We won’t get into that here, but this should get you a good kick start to tracking whether your website is converting or not.
Google Analytics is Set up and Installed! Now go Get em!
If you’ve come this far, then you’ve completed everything you need to get started with Google Analytics. You should now know how to:
- Install Google Analytics on any configuration.
- Create exclusions of your IP address and set up the URIs to all lower case in your Analytics data
- Track goals and conversions
- Be a Google Analytics wiz!
It’s time for you to start getting some traffic, conversions and then to hit the drawing board again! Google Analytics is not a means to an end. It is a tool that we are fortunate enough to be able to use for free to analyze our data and make our websites that much better!
I can guarantee you that after you have a large enough sample size, you’ll see patterns in your analytics data. For example, you might notice that your traffic doubles on Mondays and decreases near none on Saturdays. You might also notice that one of your pages converts significantly better than another.
After you have these conclusions, you will need to make educated guesses as to why this happens. You can conduct some A/B split tests and see what works and what doesn’t. Using Google Analytics to improve your website will hopefully bring you higher conversions and some bigger numbers to add to your own Money Journal.