You’ve heard it before, and I’ll say it again:
The money is in the list.
I might sound like a clanging gong but in the world of online business and blogging…
list size matters.
Fortunately, there’s a hyper effective tool that can help you do just that. It’s called Leadpages.

Leadpages is a tool that helps you grow your email list, get more leads, and automate the entire process.
Today, I want to give you a thorough review of Leadpages with three goals in mind:
Goal #1: Help you identify which package is right for you.
Goal #2: Show you actionable lead generation tactics using Leadpages.
Goal #3: Turn you into a master of Leadpages in 21-minutes tops.
Let’s jump right in.
What is Leadpages
Leadpages is a landing page builder that helps you get more leads and email subscribers. Their software is used by people who want to effortlessly create beautiful lead capture pages and maximize opt-ins.
Their tool is easy to use with simple “drag-and-drop” and “click-and-replace” templates that are all mobile responsive.
The four key features that we’ll dive into are:
- Lead pages – landing pages
- Lead boxes – two-step opt-in forms
- Lead digits – text to subscribe
- Lead links – click to subscribe
I’ll also give you practical strategies you can use for each tool so you can grow your list without blindly experimenting.
But first, let’s look at how much Leadpages costs and the pricing plan that will be the right fit for you.
Leadpages Pricing and Packages:
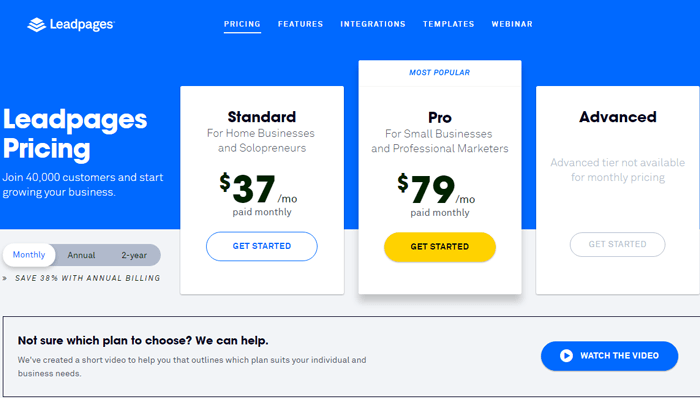
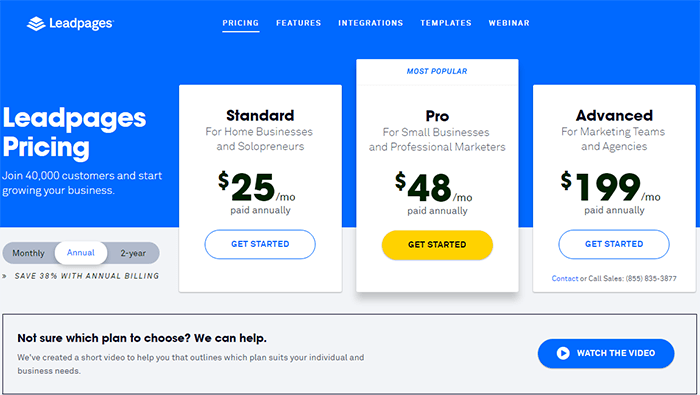
There are three pricing plans to choose from: standard, pro and advanced.
They work on a recurring billing model with prices starting at $17/month on a standard plan and up to $199/month on an advanced plan.
Here’s how their fees pan out.
Month to month billing
Annual billing
Biannual billing
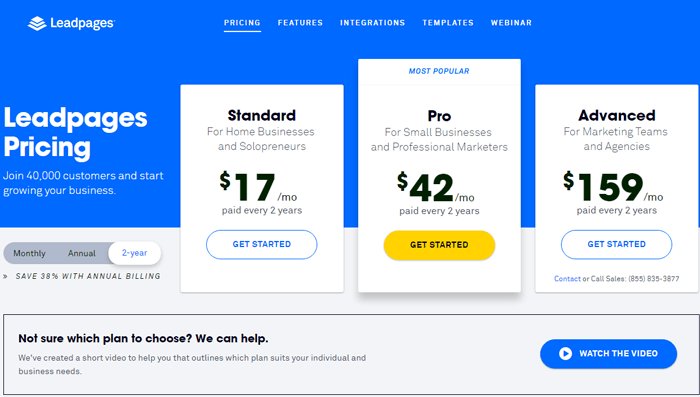
The longer you commit, the cheaper it gets. Also, the lower your package, the fewer features you’ll get.
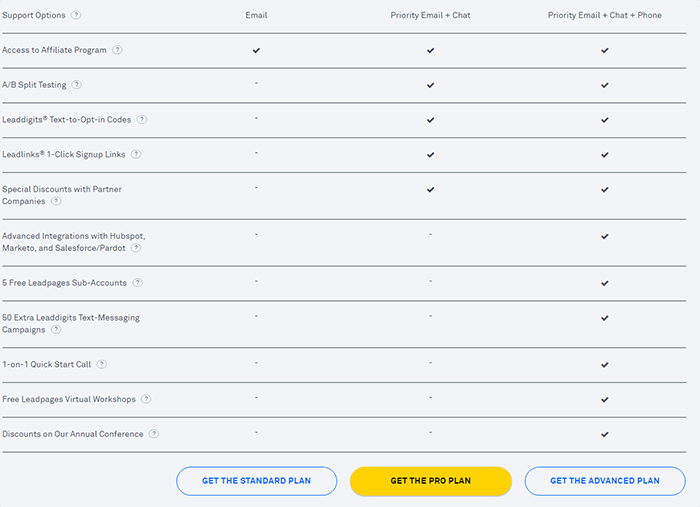
As we dig deep into the features, you’ll know which package is right for you and which ones aren’t. For example, Leaddigits and Leadlinks are only available on the pro and advanced levels.
If you don’t have a need for these, then go with the standard plan.
Here’s a feature comparison chart that shows which features you’ll get and won’t get based on your subscription. Alternatively, you can check out the chart for yourself on their pricing page.
Leadpages Trials and Guarantees
Leadpages does not offer a free trial. Instead, they offer a 30-day money back guarantee that protects buyers in case they aren’t satisfied with the product.
If you think the features that I show you today are ones that your business will benefit from, then I encourage you to give them a shot.
Great product + great support + great price = friend of Sam.
Let’s jump right into the core features of Leadpages and specific tactics that are super easy to execute using their software.
Feature #1: Leadpages = Landing Pages
Leadpages are landing pages. This is the bread and butter of their software and it’s why I subscribed in the first place.

There are hundreds of free templates to choose from and it’s just a matter of replacing text and your media elements (images, videos, and icons).
There are two landing page builders you can choose from.
- Standard builder
- Drag-and-drop builder
Standard Builder
Currently, the standard builder has 132 free templates. They cover virtually everything from eCommerce to sales pages and even niche pages for real estate agents and authors.
Here’s a quick view of the landing pages you can choose from.

Once you’re inside, it’s just a matter of replacing text and images. Here’s a short video of the standard landing page builder in action.
The downside of the standard builder is that you only have the option to alter text, images, and show/hide different parts of the page.
Beyond that, you won’t be able to customize anything further.
Pro:
- Create landing pages within 2 minutes (seriously).
Con:
- Lacks customization options.
Drag and Drop Builder
The drag-and-drop builder is a newer feature in Leadpages and works exactly as it sounds:
Drag it and drop it.
There are 90 free templates to choose from today.
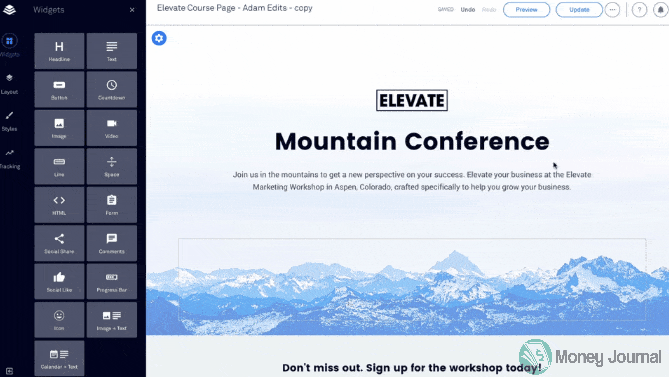
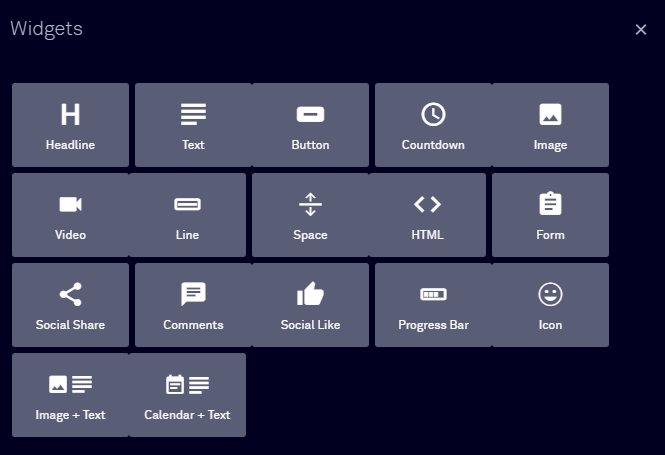
Unlike the standard builder, the drag-and-drop software allows you to fully customize the layout of the page. You can add widgets like countdown timers, buttons, Facebook comments, and opt-in boxes wherever you want.
Pro:
- Fully customizable landing page builder with a library of premium widgets.
Con:
- Takes a while to get used to the interface when making layout changes.
Here’s a quick demo of the drag-and-drop builder in action.
Setting up your Lead Page
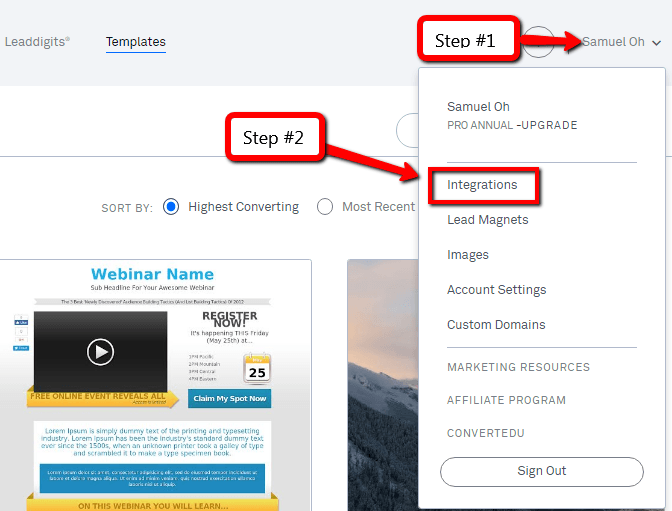
Before you can start capturing leads, you need to create a connection between your email service provider (ESP) and Leadpages. You can do that by clicking on your name and then integrations.
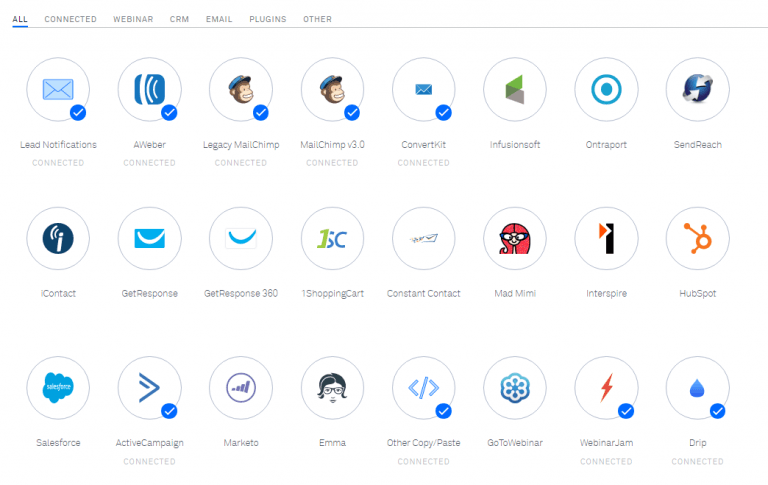
Next, choose your ESP or webinar software you’d like to connect with Leadpages.
Once you have that setup, it’s time to create your page.
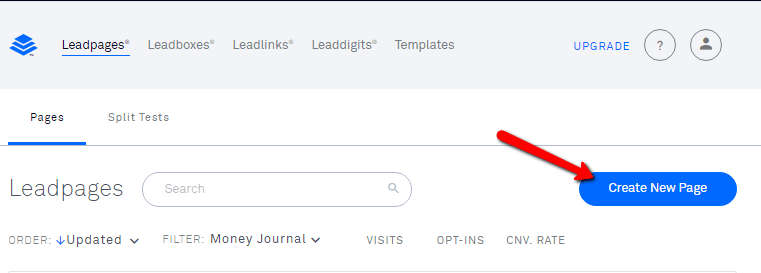
From the main menu, click “Create New Page.”
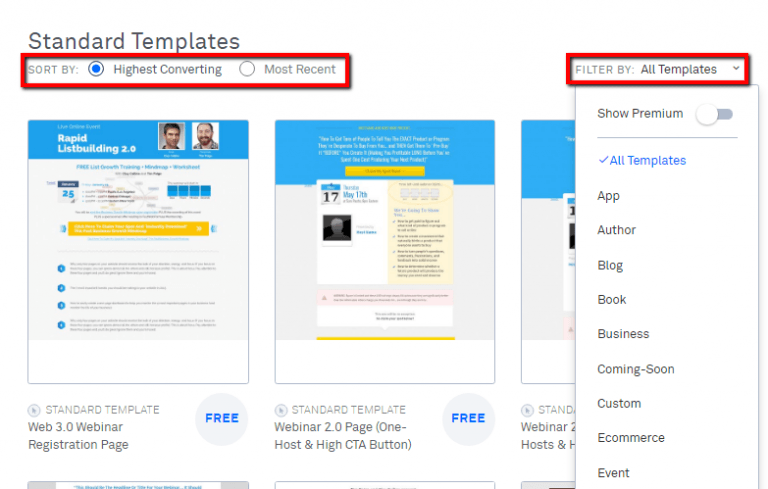
Next, choose a template that best fits your needs. You can sort by highest converting or most recent pages and filter by template type.
Now, you’ll need to add your landing page copy and images until you’re satisfied with the design.
If you missed the videos on designing your lead page, you can watch them here.
Standard Landing Page Builder Drag and Drop Builder
Next, you need to choose which form you want visitors to be subscribed to.
You can start by clicking on any button in your lead page and a popup will appear. The popup is actually a Leadbox which we’ll talk about in more detail in a second.
Aside from the design of the lead box, there are 3 parts you’ll need to configure.
- Integration settings – your email service provider.
- Tracking codes – your Google analytics code and Facebook retargeting pixel.
- Custom thank you page.
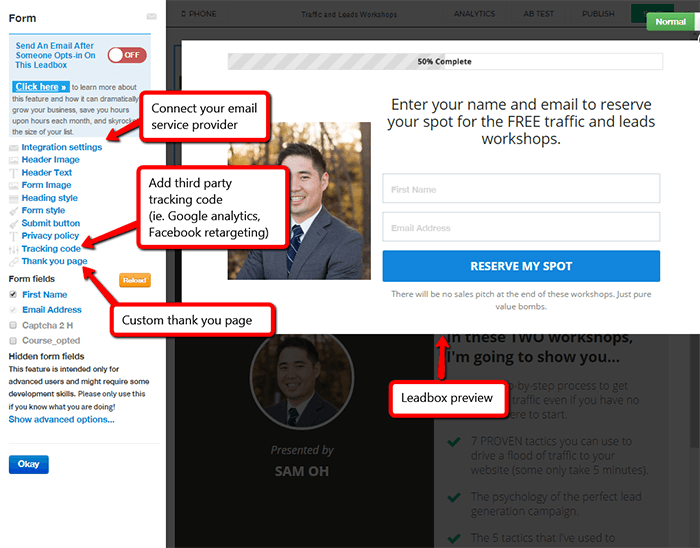
1. Connect your Email Service Provider and/or Webinar Software
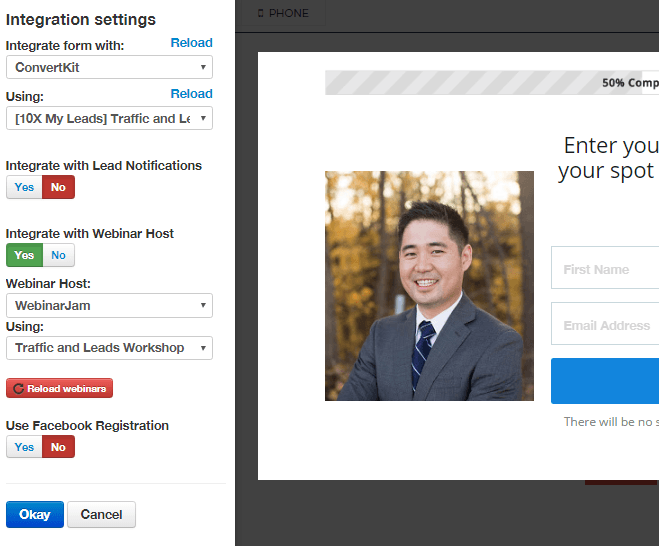
When you click on integration settings in the sidebar, you’ll have the option to choose any form from the ESP you set up before.
In this case, the lead page is connected to my Convertkit account using the form for my lead generation training program.
Since this particular lead page was for a webinar, I was also able to connect it directly with Webinarjam.
Here’s what the setup looks like.
This page is now ready to start capturing leads.
2. Add your tracking codes
When clicking on tracking codes, you can add in any third party javascript snippets. I highly recommend adding your Google analytics code and Facebook retargeting pixel.
This way, you can get deeper insights on your audience and retarget visitors who visit the page but do not convert into a subscriber.
![]()
3. Always include a custom thank you page
Think about it like this:
When someone signs up for your lead magnet or webinar, there is positive momentum. They’re saying:
“Yeaaa…I’m in.”
So instead of just saying “thanks,” use your thank you page to accomplish another goal.
Maybe you want to get more social shares or collect survey data. You can even provide a one-time offer on that thank you page to make a sale.
Whichever route you choose, you can create a custom thank you page in Leadpages too.
Here’s a full tutorial on growth hacking thank you pages.
Adding your thank you page to your lead page is easy. Just click on “thank you page” in the left sidebar and enter the URL.
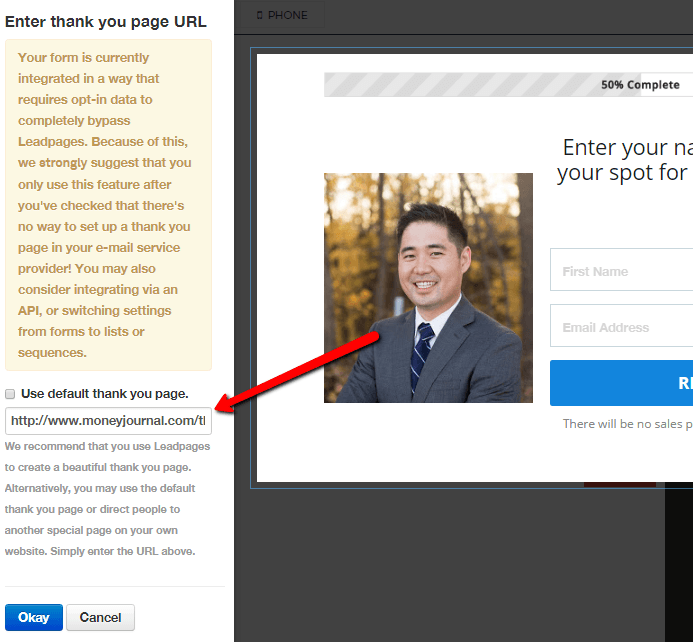
And you’re all set to go. Save your lead page and hit the publish button at the top.
Once you’ve published your page, you’ll have a few options.
You can use your lead page on the Leadpages.net subdomain, WordPress, Facebook page, or on your own server.
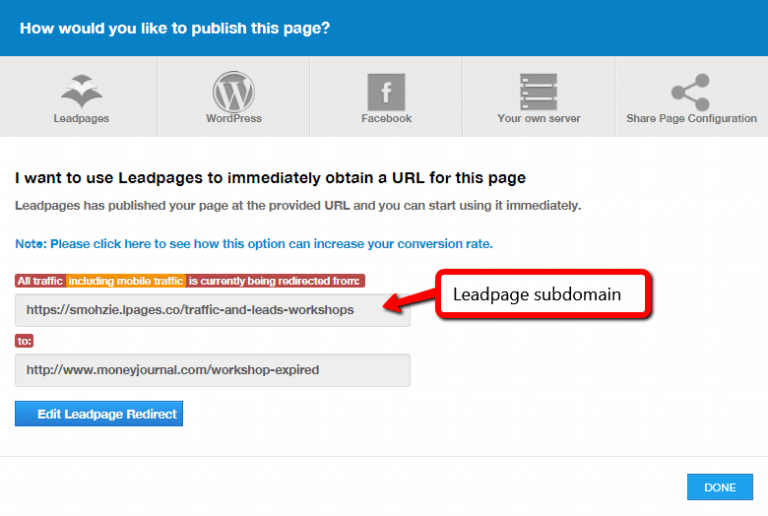
If you choose to publish the page using WordPress or your server, you’ll be able to use the landing page on a custom address like yourdomain.com/this-landing-page.
BOOM!
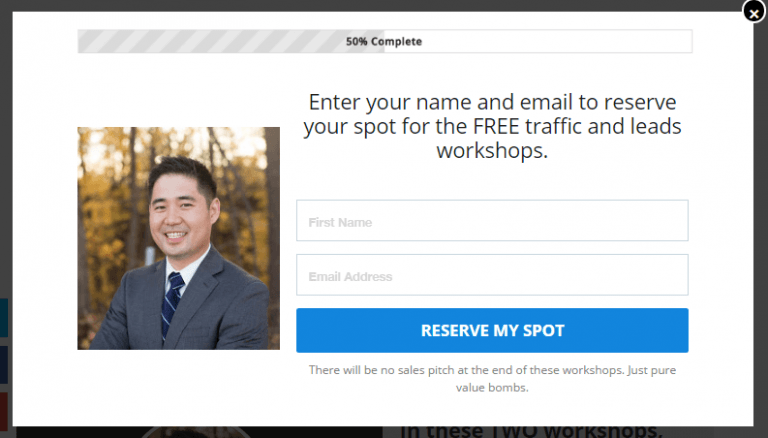
Now you have a fully optimized lead page that will look great on any device. Here’s a quick preview of the mobile responsive version.

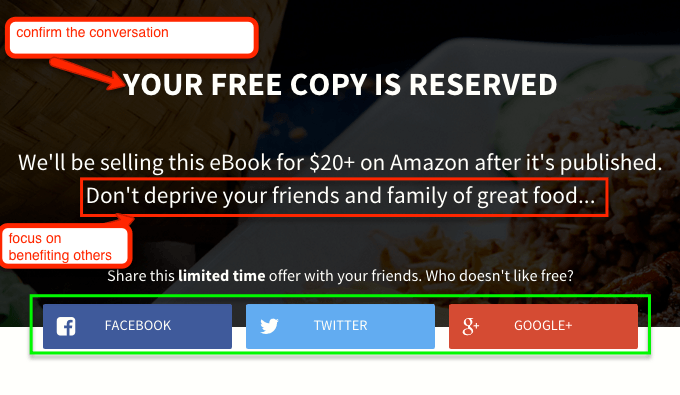
Feature #2: Leadboxes = Popup Opt-in forms
Remember the opt-in box I just showed you? Those are lead boxes.
In case you forgot, here’s what it looks like.
The setup is the exact same as setting up the opt-in form on landing pages. But don’t be fooled…
Leadboxes have driven more than 95% of my blog leads. Here’s how you can use them to start getting more subscribers.
With Leadboxes, you can create a modal popup from a text link, button, or image.
Here are a few tactics you can use to start getting more email subscribers with two-step opt-ins.
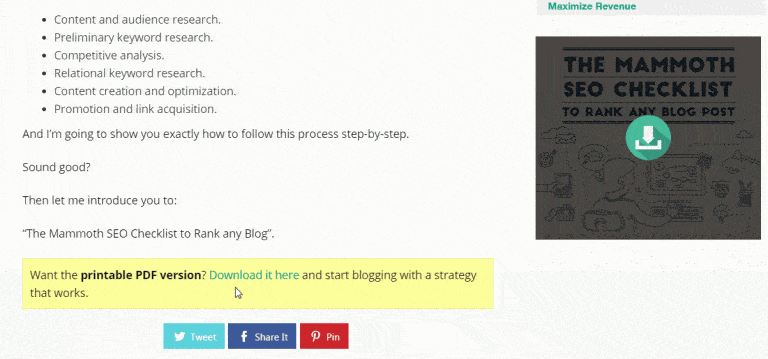
1. Content Upgrades
A content upgrade is a bonus created specifically for a blog post that readers can get in exchange for their email address.
They convert really well and if you’re not using them in your blog posts, then you need to start.
There are two steps to setting up your content upgrade.
Step #1: Set up your lead magnet delivery
If you’re offering a digital product like an eBook, white paper, or a checklist, then you need a way to deliver it to the end user.
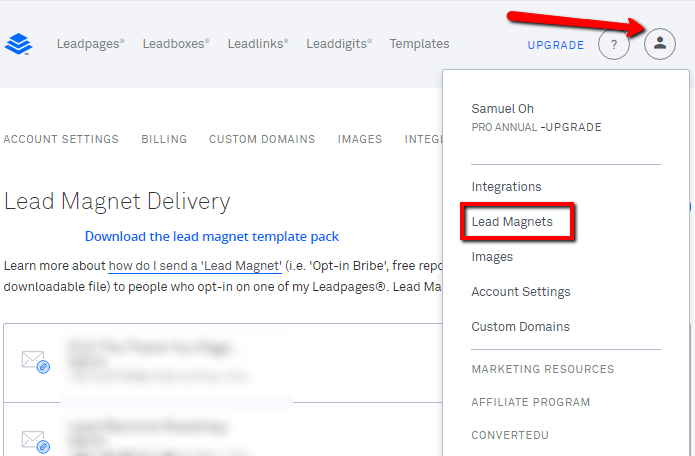
First, click on your name in the top right corner and choose “Lead Magnets.”
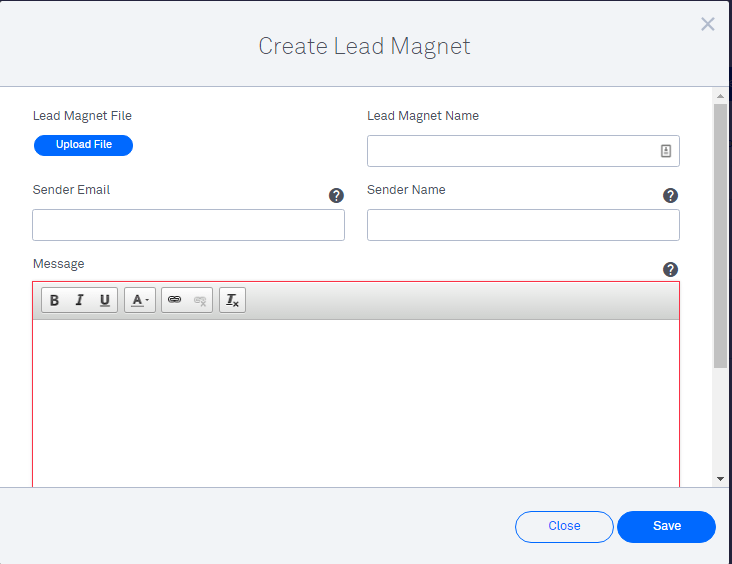
Click the “Create New Lead Magnet” button and fill in the information you want to be sent to new subscribers.
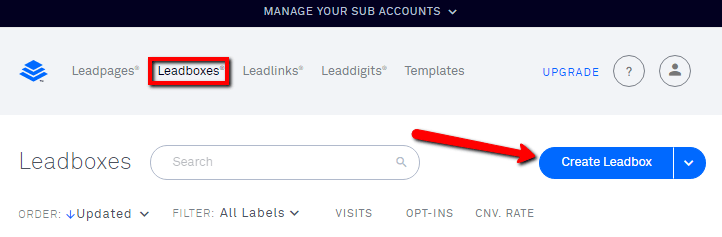
Next, you’ll need to create your Leadbox. You can do this by clicking on the Leadboxes menu at the top and hitting the “create Leadbox” button.
Once the page loads, it’s just a matter of integrating it with the correct form from your email service provider and setting your thank you page just as we did in the landing page example above.
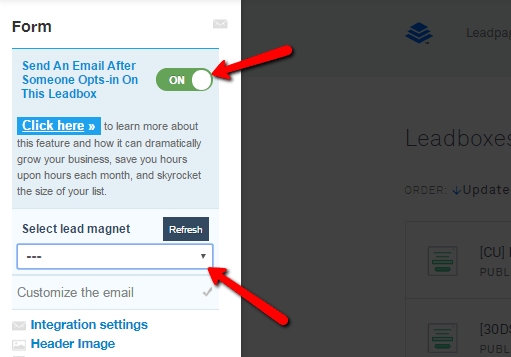
The final step is to integrate your form with the lead magnet.
Flick the on/off switch and choose the lead magnet that you created.
Finally, hit the publish button and choose the publishing option you want. In this example, we’ll use a plain text link.
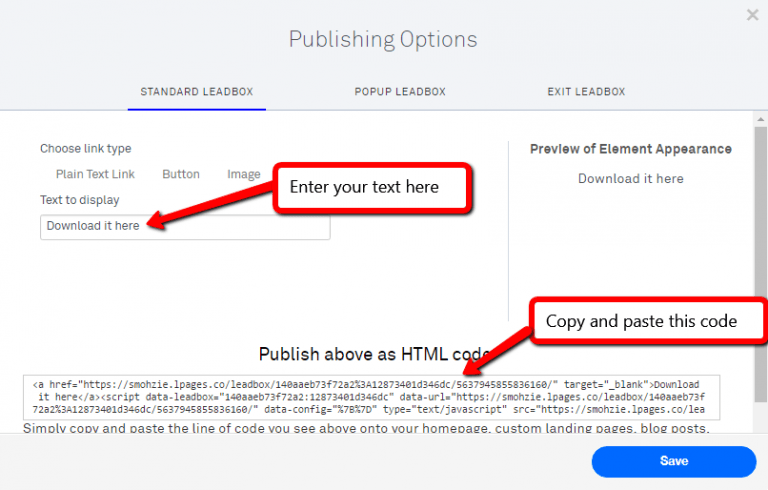
Just copy and paste the code where you want the Leadbox to appear and you’ll be all set to go.
Now every time someone opts-in for your content upgrade, the lead magnet delivery will take care of everything.
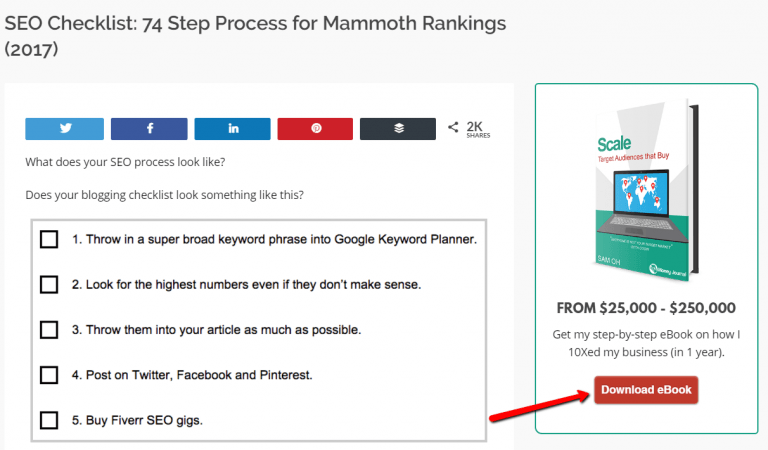
Here’s an example of how I use a content upgrade in my SEO checklist.
2. Sitewide sidebar offers
Another strategy you can use with Leadboxes is to include a sitewide offer in your sidebar. Mine looks like this.
When you click that button, a lead box will appear. The setup is the exact same as I showed you for the content upgrade.
3. Category specific exit-popups
The third tactic you can use is to create category specific exit popups. To set this up, go to the publish options and choose “Exit Leadbox.”
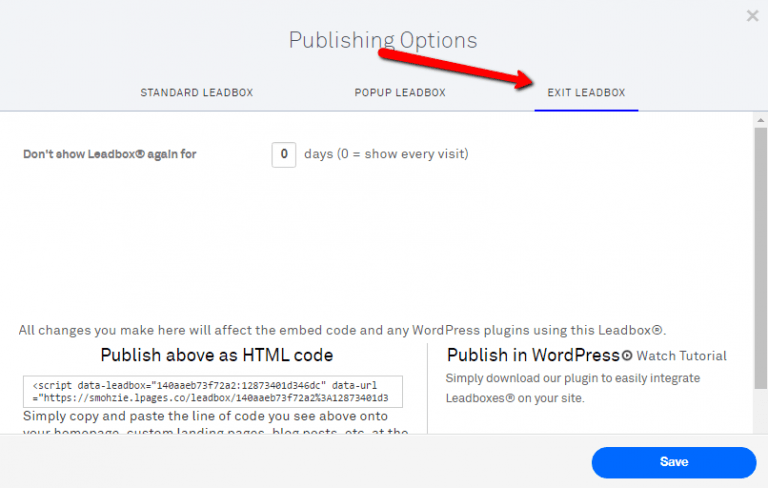
Copy and paste the HTML code on the category pages/posts where you want the opt-in form to appear.
The key is to create exit popups that are relevant to the posts that your audience is reading.
For example, if I were to add a social media related offer on a lead generation post, it probably wouldn’t convert well.
Stay relevant and use the same principles for category pages as you would for content upgrades.
Feature #3: Lead Digits = Text to Subscribe
You’ve probably seen a text to subscribe contest like this.

Lead digits allow you to create your own text to subscribe offers.
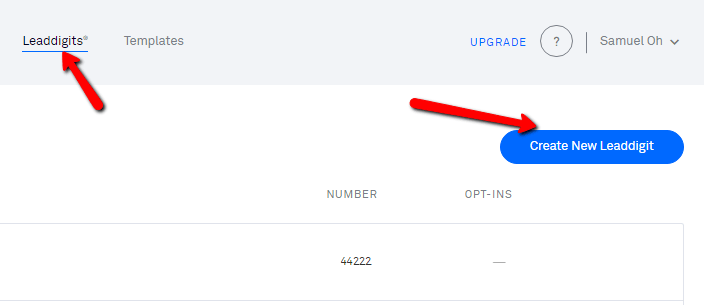
Here’s how you set it up. Choose Leaddigits from the top menu and click the “Create New Leaddigit” button.
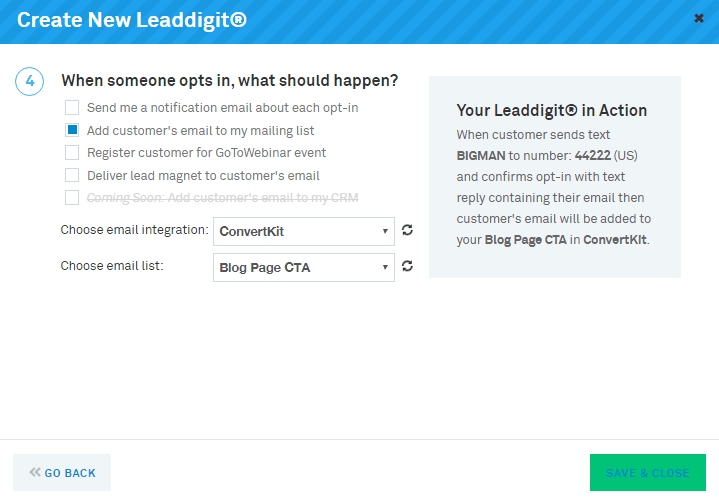
Select your country, phone number, text word, and the message that a new subscriber should send to subscribe.
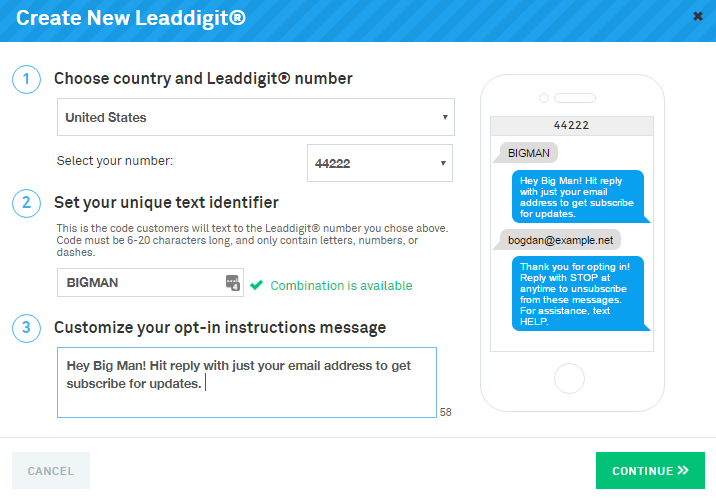
Finally, check the box that adds the person’s email address to your ESP and save your lead digit.
Now, if you’re in the United States and text the word “BIGMAN” to 44222, you’ll be subscribed to my blog.
Where should you use Leaddigits?
The most common places I’ve seen Leaddigits used is in offline marketing. Here are a few ideas you can use:
- Magazines
- Radio and TV commercials
- Billboards
- Conference slideshows
- Signage
The main online source I’ve seen these used in are Podcasts. I tried them in my YouTube videos, but it didn’t work well. Maybe it will work for you 🙂
Mobile is taking over the internet, so this might be your ticket to get in early.
Feature #4: Leadlinks = Click to Subscribe
Leadlinks allows users to click a link and to automatically subscribe them to a new list or form.
You might be thinking:
“My email service provider already has marketing automation built in.”
But there’s a really effective list building tactic you can use with Leadlinks. More on this in a bit.
So how do you set up a lead link?
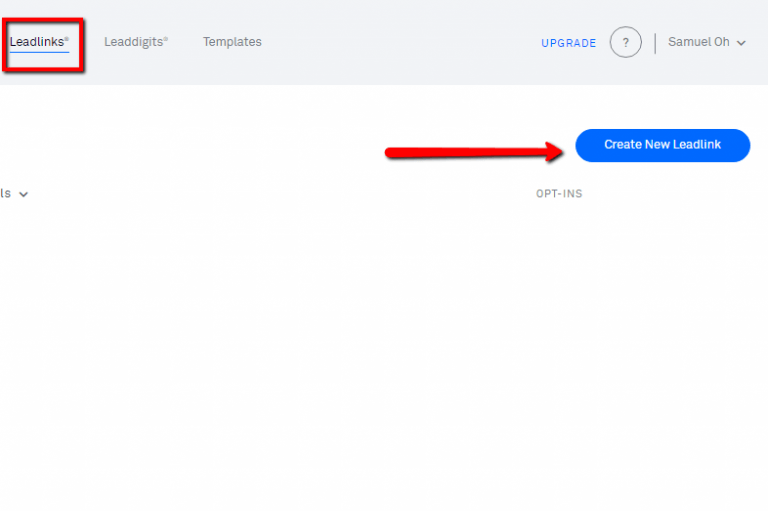
You can start by clicking on Leadlinks in the top menu and then hitting the “Create New Leadlink” button.
Next, choose the opt-in form you’d like people to be added to and click “Customize this link.”
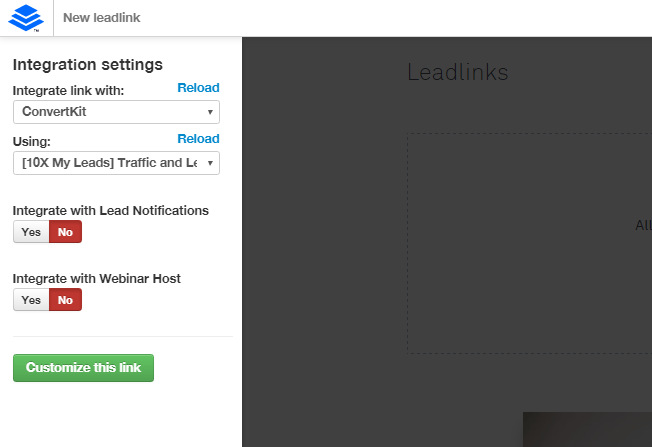
Add your custom thank you page URL as I showed you in the previous examples and then click save.
The last step is to select the email service provider you’ll be using and copy and paste the link.
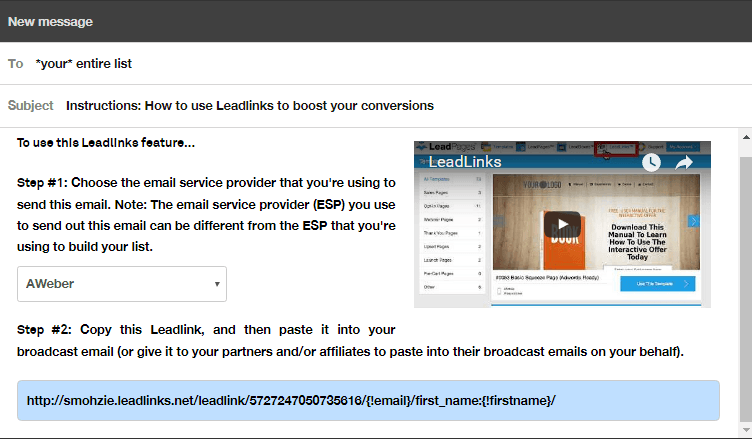
If you look carefully at the image above, you’ll notice that there are two fields in braces (email and first name). These are called “merge fields” and they’ll vary depending on the email service you use.
If you don’t see your ESP in the dropdown, then you can manually fill in the merge fields.
So when should you use lead links?
#1. Subscribe your current subscribers to a different form or list.
If you’re hosting a webinar and you want to invite your current subscribers, then you don’t need to send them to a new landing page.
It can be redundant and will lower attendance for your event.
Instead, you can send them a lead link that will automatically subscribe them to your webinar form. This way, you’ll be able to increase webinar attendance and stay on good terms with your subscribers.
If you already have an ESP that has marketing automation built into it, then you won’t have to use it for this.
#2. Joint webinars and affiliate programs.
Leadlinks are absolute dynamite for use case #2.
What’s the fastest way to grow your list?
Trade subscribers with other people who have your ideal audience.
With Leadlinks, you can pitch other websites that have your ideal customers and ask them to embed your Leadlink in a broadcast.
In exchange, you would send an email to your list with their Leadlink so they can capture leads from your email list.
ConvertKit used this tactic to generate $480,000 in MRR in 2016 and added 25,000 new subscribers from joint webinars alone.
If you can find creative ways to use Leadlinks, converting subscribers will be a breeze.
Conclusion
Leadpages is in my top 3 must have tools for lead generation and list building. But there isn’t a single tool out there that’s going to magically make the leads pour in.
This software takes the technical headaches out of the picture for a price that almost anyone can afford.
If you don’t already have a landing page software you’re using, then I highly recommend giving Leadpages a shot.
Lead generation is the lifeline to all profitable businesses. If you value saving time and growing your list, then it will definitely be worth the investment.
Give it a shot and let me know if you have any questions in the comments below.

From $25,000 - $250,000
Get my step-by-step eBook on how I 10Xed my business (in 1 year).